Disclaimer: This won’t be a tutorial or explanation about how to setup things, because that’ll take way too long. I’ll quickly go through some of the choices I’ve made and maybe it can serve as inspiration to others. There are currently a lot of tutorials for setting up some of the details in pfSense, please use google for finding those.
Brief introduction to pfSense
pfSense® software which I wrote about in the previous blog post, is software specifically tailored for use as a web interface-managed firewall and router. It exists in 2 versions:
- a free, open source version: pfSense Community Edition (CE) that comes without hardware (=you have to buy your own hardware), see e.g. https://www.pfsense.org/download/
- a proprietary version: pfSense Plus, which is factory-installed when buying Netgate’s official hardware, see e.g. the Netgate-series products at https://shop.netgate.com/
Furthermore without going too much into deeper into it, there’s also https://opnsense.org/download/ which is a similar product. Enough about that…
My (hardware) setup
pfSense by itself doesn’t really take many resources. I run it as a virtual machine on an upgraded low power thin client I bought on ebay. My hardware:
- a HP T730 Thin Client: https://support.hp.com/us-en/document/c04853546
- Upgraded from 8 to 16 GB RAM (couldn’t find 2×16 GB RAM for a reasonable price, so I went with 2×8 GB instead).
- A low-profile Intel i350-4 PCIe Ethernet card, providing me with 4 extra 1 Gigabit ports (NICs).
It is excellent in terms of power-consumption: It only draws around 25 W so this machine is awake 24/7/365 without contributing too much to my electricity/energy bill and I can use it for a lot of services, e.g. fileserver, running Virtual Machines, containers (LXC/docker etc).
My Proxmox VE setup (not needed for pfSense)
This machine runs Proxmox VE which is a type 1 hypervisor, characterized by running on bare metal, i.e. it runs directly on the underlying computer’s physical hardware instead of being installed on top of e.g. Windows/Linux or another OS (think e.g. VirtualBox, which is a type 2 hypervisor).
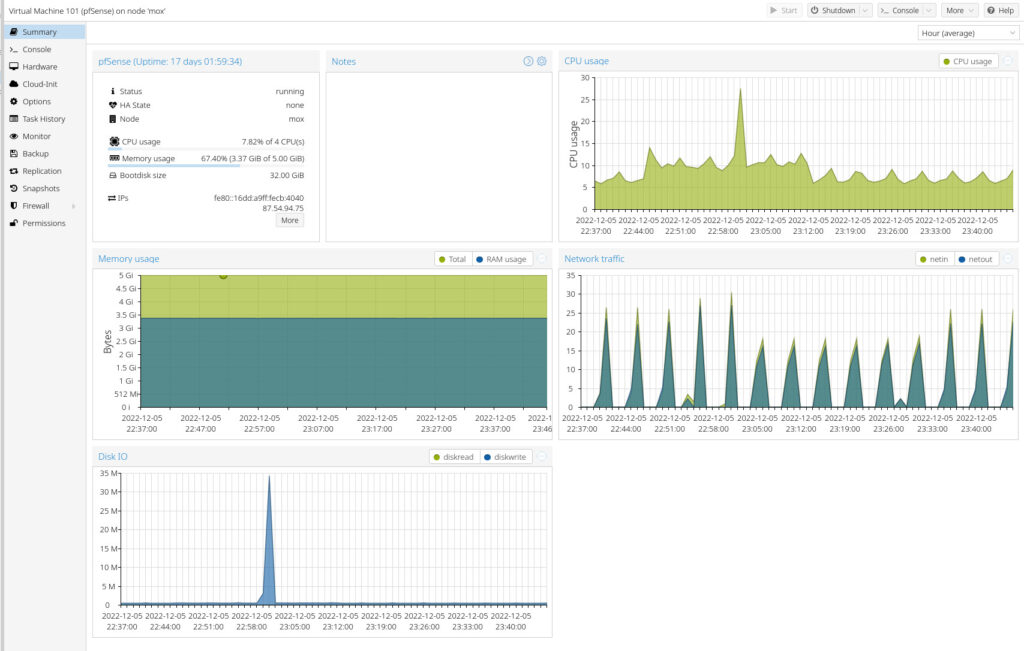
While Proxmox isn’t as well-known as VMware ESXi, especially in corporate environments where VMware is market leader (and used practically everywhere), Proxmox VE is Open Source and free to download and use. VMware ESXi on the other hand, is part of VMware vSphere, which is an expensive proprietary technology, although there is a limited free version. Because I prefer to not pay for software that is excellent and runs perfectly fine, I’ve never considered ESXi as an alternative to Proxmox, in my home-setup (maybe I’ll go through this setup in more details in a future blog post).
Shortly about my network-setup
In addition to the hardware above I also have 2 managed switches for controlling my VLANs and my old Netgear R7000 router is currently in use with DDWRT firmware, but acting as a Wireless Access Point. For reasons I’ll not go through here, it’s important that the “DHCP Server” on the R7000-router is disabled and the “Gateway” is pointing to the IP address of the pfSense-interface (=the main router and DHCP-server).
I then physically connect my VLANs through trunk ports, through both managed switches and because DDWRT understands VLANs I can use the DDWRT webUI-interface to assign VLANs to physical access ports. With this setup I have 2 or 3 VLANs going through the DDWRT-router, but everything important related to VLANs (=the firewall) is controlled by pfSense. Those VLANs each have their own subnet, i.e. in my case VLAN 1 is using subnet 192.168.1.0/24, VLAN 10 is using subnet 192.168.10.0/24, VLAN 40 is using 192.168.40.0/24 and so on.
An overview of my pfSense-setup
Let’s start by seeing which VLAN interfaces have currently been defined:
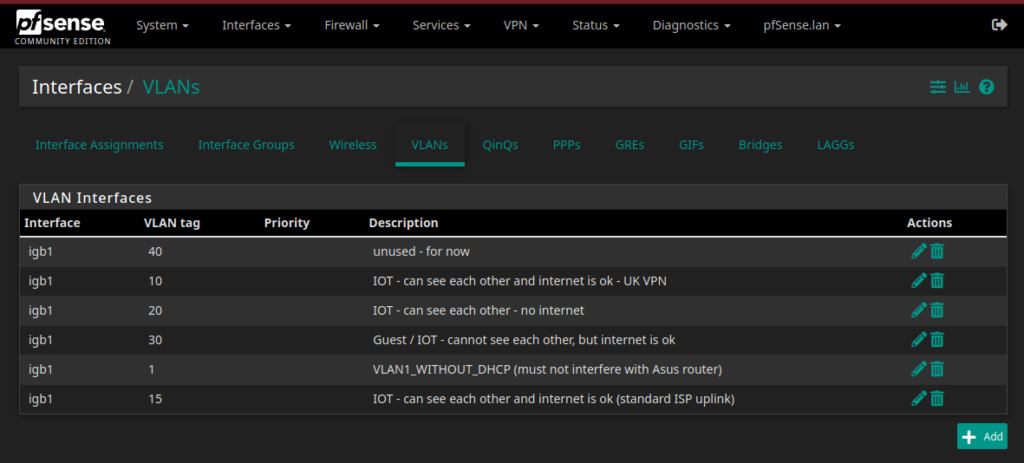
The WAN-interface is what provides access to everything on the internet. I currently have 3 IOT-VLANs although they’re not all active at the same time (VLAN 10, 20 and 30). Furthermore I earlier experimented with routing everything connecting to VLAN 10 through a VPN-connection (known as https://en.wikipedia.org/wiki/Policy-based_routing ), but I haven’t updated the interface-name as seen in the screenshot below.
Interface Assignments
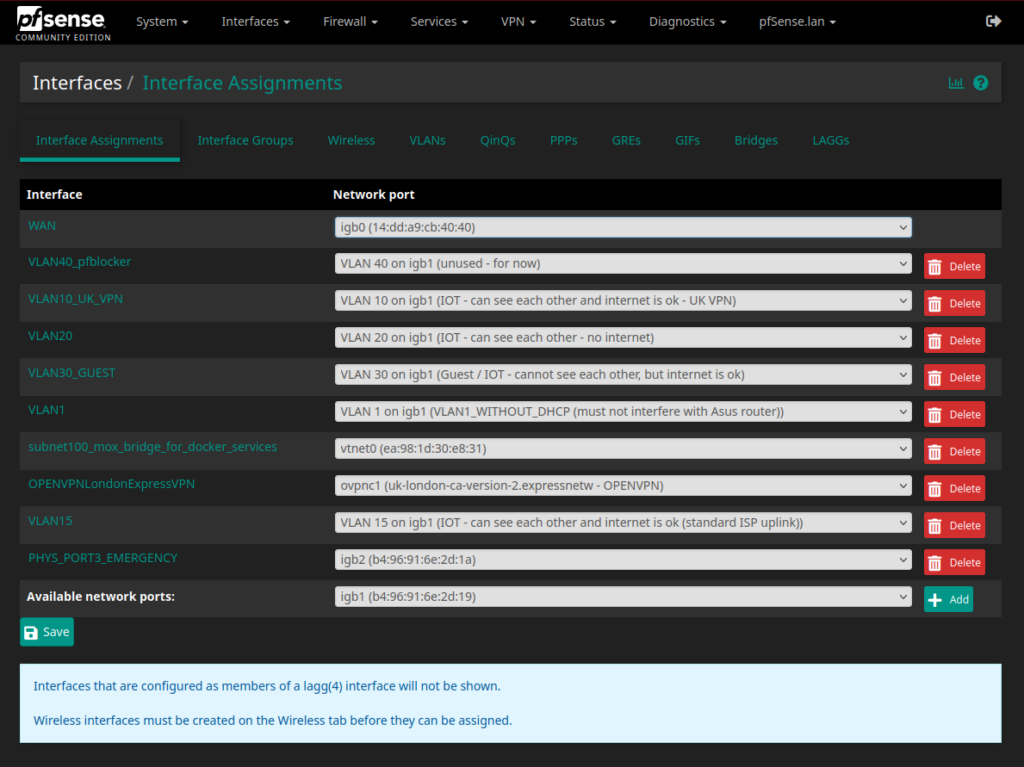
VLAN 100 is a special VLAN I use for a virtual bridge – on VLAN 100 I run my fileserver and it has a special VLAN because it has some special rules, because different individual devices needs access to the fileserver. And then I have the interface “PHYS_PORT3_EMERGENCY” – because I’m sure it has happened to everyone messing with firewalls, that once in a while you accidentally lock yourself out. Unless I totally screwed up, I can now plug in a cable to the physical port 3 and e.g. revert/restore previous configuration settings.
Firewall rules
Firewall rules are very important when it comes to the whole network segmentation and network security discussion. I’ll not go through all the rules I have, but as an example the firewall rules for VLAN 1 is shown below:
VLAN 1-rules
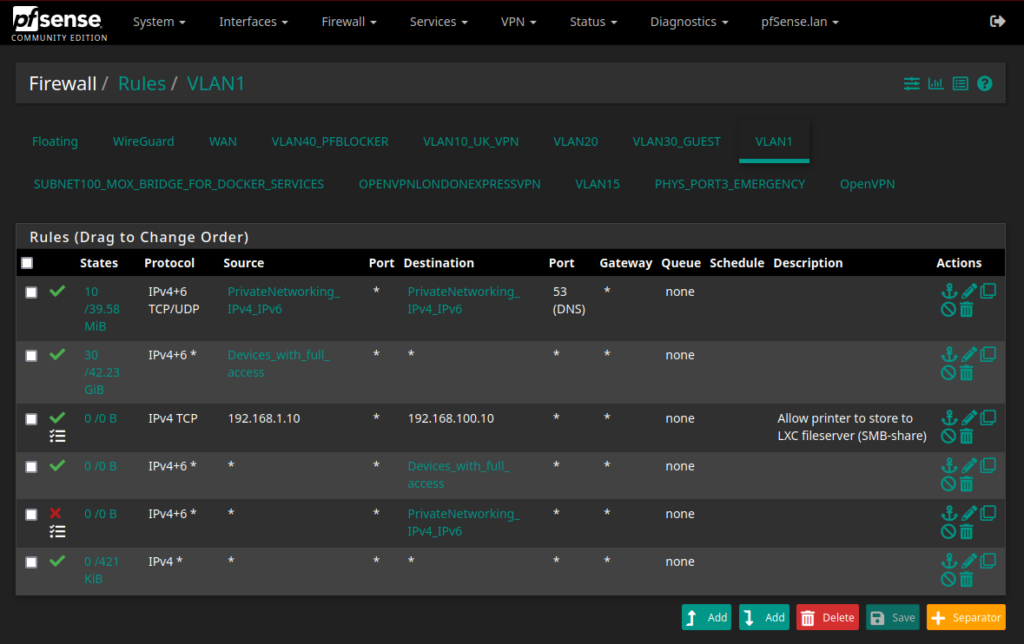
The rules are defined from top to bottom so everything in the top is pass/allow-rules (with the green check mark).
- The first rule tells that on VLAN 1, i.e. on the 192.168.1.0/24 subnet, DNS-traffic (port 53) is allowed as long as it’s from and to 192.168.xx.xx. If this rule weren’t there, we would not automatically obtain a DHCP-address from the DHCP-server.
- The second rule is an “allow everything” from some specific devices (mostly my laptops, they’re used to administer everything). This means that my VLAN 1-laptops can ping/access all devices on all VLANs.
- The third rule is a special printer-rule. Normally VLAN 1-devices are not allowed to communicate with other VLANs, but the printer at IP 192.168.1.10 is allowed to communicate with IPv4 TCP protocol, to the fileserver at 192.168.100.10 (which is a Linux container).
- Next I also allow data on VLAN 1, from everywhere (incl. other VLANs) with destination “Devices_with_full_access, to pass.
- Finally, pretty much everything else is blocked as indicated by the red cross in the left margin.
VLAN 20-rules
For comparison purposes, I’ll here show my VLAN 20-firewall rules:
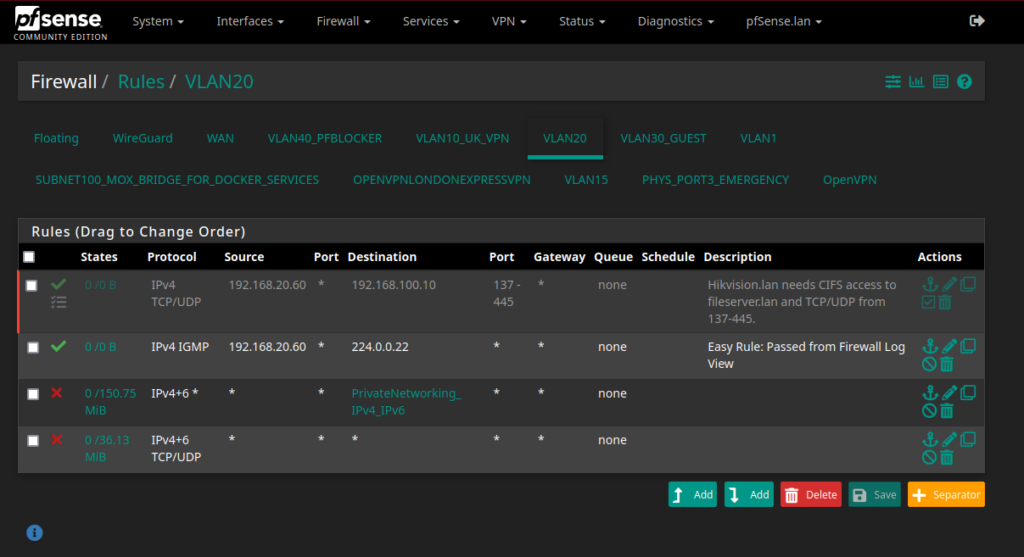
There are only 4 rules:
- First rule opens up port 137-445, which is for CIFS-access to the fileserver.
- The next rule explicitly allows traffic to 224.0.0.22, which is the multicast address for Internet Group Management Protocol. This rule is made, based on the firewall log because now this traffic will not clog up or fill (as much) up in the log. This makes it easier to see the remaining firewall blocks.
- The third and fourth rule blocks all other traffic.
Investigating the firewall logs
Investigating the firewall logs is the moment where all the hard work begins to pay off and interesting conclusions can be made. There are a lot of things one can look at. For now I’ll show something very simple and easy:
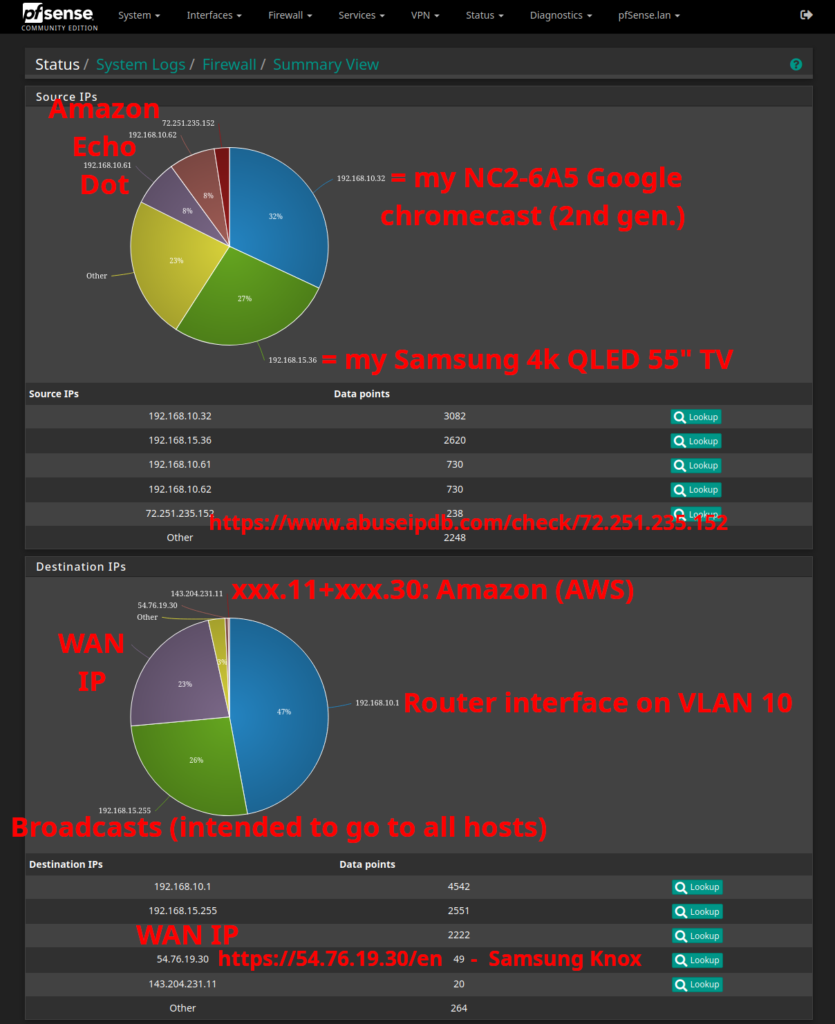
Blocks based on “Source IPs” (the top pie-chart)
Although I have around 42 network devices, my 2nd generation Google Chromecast is aggressively responsible for around 1/3 of the firewall block entries. My Samsung TV is responsible for 27% – and then I have 2 Amazon Echo Dot devices that also take their (more than) fair share of blocks.
If we look at the single IP address that is not coming from my own network, a quick google check reveals that the IP 72.251.235.152 has >2700 user reports, namely “port scan”, “hacking”, “exploited host”, “VPN IP”, “Web App Attack” and so on. So this definitely looks like a malicious IP address that should be completely blocked (see e.g. https://www.abuseipdb.com/check/72.251.235.152 for more details and check out the >2700 user reports).
Blocks based on “Destination IPs” (the lower pie-chart)
This pie-chart reveals the outgoing connection blocks. 47% of blocks are on VLAN 10, which is my IOT-network (=insecure devices). 26% of block-entries is broadcast traffic, i.e. the traffic routed for xx.yy.zz.255 is an address meant for routing messages to be sent to every device within a network. When it appears in the firewall like this, it means that pfSense is blocking what was sent to it and refusing to forward that data to all other devices in the same subnet. More specifically, the IOT-devices will receive the broadcast at layer 2 (see https://www.geeksforgeeks.org/layers-of-osi-model/), unless forwarding is disabled.
I don’t currently think any of my IOT-devices need to talk or communicate with each other:
- Why would my Amazon Echo Dot communicate with my Samsung TV?
- Why would my Chromecast communicate with my temperature sensors? So currently on VLAN 10, this traffic is being blocked.
- Why would my Yamaha receiver communicate with any of my other internal IOT-devices?
The problem is that if one of the IOT-devices becomes infected with malware, it’ll attempt to spread across all devices it can find and in this case it’s a great security precaution to have strong firewall rules.
Next we have 23% of the block firewall entries, for the WAN IP. It’s not unusual to have malicious actors or maybe malware-infected machines, to do a lot of port-scanning and try to find security vulnerabilities so they can get control and maybe use it as part of a larger DDoS botnet.
Finally, after this screenshot was made I realized I had a minor mistake in my firewall rules on VLAN 10, which is illustrated by the following screenshot:
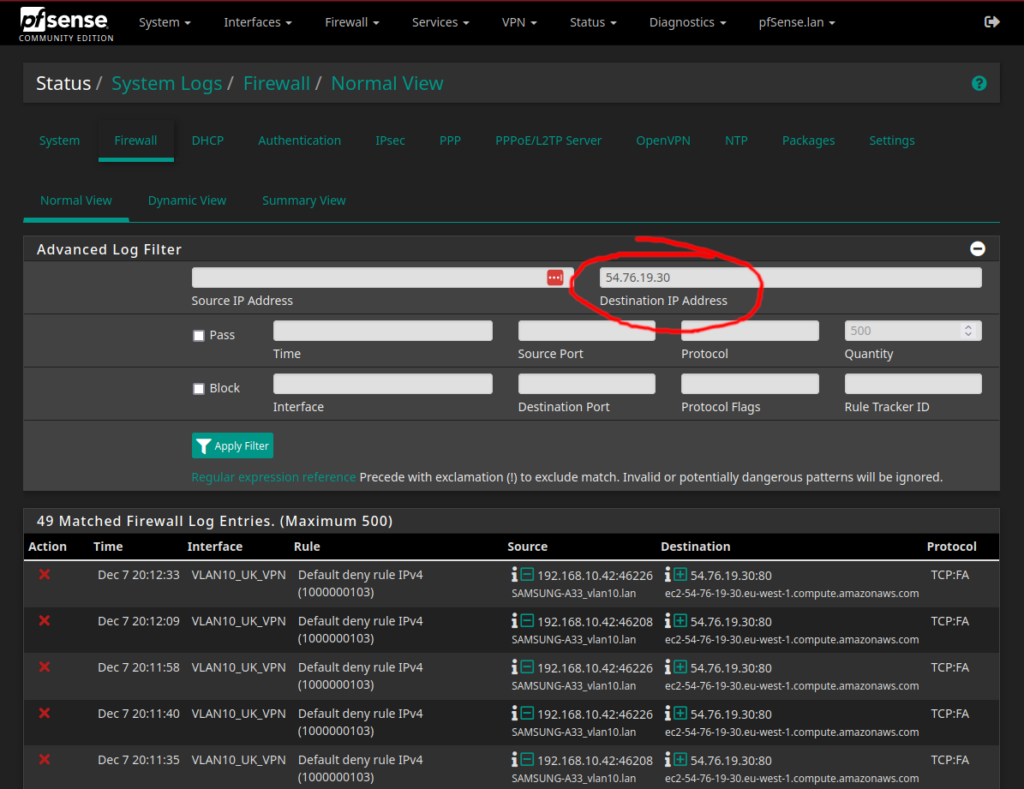
The firewall log tells that one of my trusted devices could not connect to the web server at https://54.76.19.30/en and this was a minor mistake that has now been fixed. The website seem to belong to Samsung:
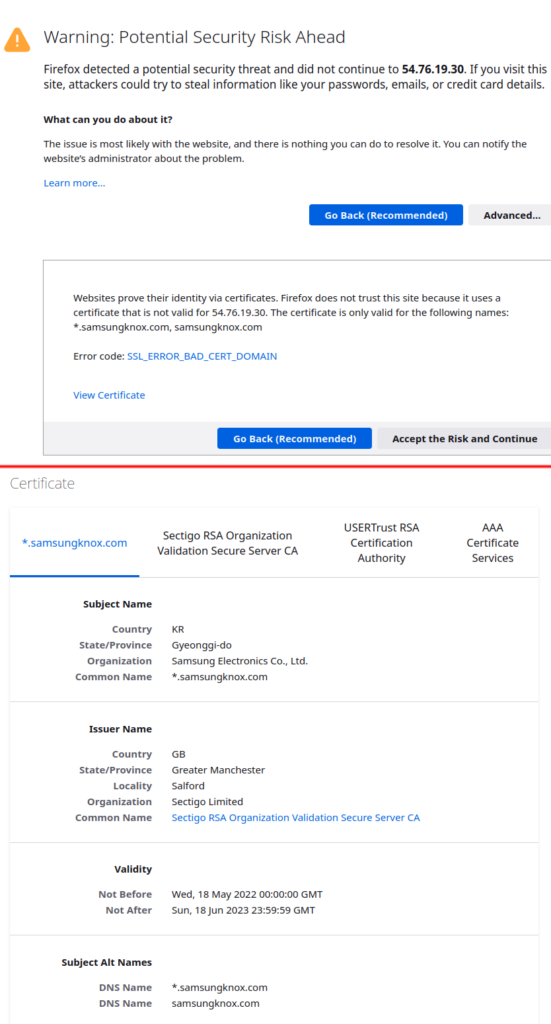
The Samsung Knox website/IP address is probably (at least) partly responsible for automatically downloading security updates for my Samsung (mobile) phone. If I hadn’t found this minor firewall mistake I probably wouldn’t have added these last extra useful screenshots and I think the description above is useful for illustrating the basic parts of how I work with, debug and update/modify firewall-rules. The firewall rules can be permissive or strict – basically I have very strict rules for the IOT-network and relatively permissive rules for the network where I have my work pc’s.
Conclusion
This and the previous blog posts illustrates the most important part of how pfSense works and why you need it – or a similar firewall-solution. There’s however a lot of other possibilities and settings I’ve not shown. As an example, I’ve also experimented with Intrusion Dectection System‘s and installed Snort and Suricata – maybe this could be the topic for a future blog post, but not now.
I hope this blog post maybe inspired someone to look more into these technologies and/or maybe write with suggestions for improvements.
11 replies on “Why I’m using pfSense and a brief walkthrough of my setup (part 2/2)”
Hiya very cool site!! Guy .. Beautiful .. Wonderful .. I will bookmark your web site and take the feeds additionally?
I am satisfied to seek out a lot of useful info right here within the publish, we’d like develop extra strategies in this regard,
thanks for sharing. . . . . .
It is motivating to read that, thanks a lot (and sorry for delayed answer). I’m not completely happy about the layout though – it probably takes a while before I learn enough WordPress to make everything look nice.
Magnificent website. A lot of useful information here. I抦 sending it to a few friends ans also sharing in delicious. And certainly, thanks for your sweat!
I appreciate that, good to hear – thanks a lot!
Pretty component of content. I simply stumbled upon your site and in accession capital to assert that I get actually enjoyed account your weblog posts. Any way I will be subscribing in your augment or even I fulfillment you get entry to persistently quickly.
I can’t thank the author enough for this enlightening article. It not only provides valuable information but also addresses common misconceptions, offering a more nuanced view of the subject. The writing style is engaging, making it an enjoyable read from start to finish.
At this time, it seems like WordPress is the preferred blogging platform available right now. (from what I’ve read) Is that what you’re using on your blog? Great post, however, I was wondering if you could write a little more on this subject?
Yes, I’m using wordpress – yes, you’re right, it seems to be the preferred blogging platform, used everywhere – so a good place to start I think… About writing some more about pfSense: I’ve just ordered some new and better hardware to run pfSense and Proxmox on – this should soon replace my old system and setup. I might write about that within the next two months, if I can come up with an angle that is interesting enough, for an audience like those who reads these things on my website. However, recently I’ve changed job, got some new things I want to look into and learn and it’s also summer – the weather is good, so I don’t get to look so much into pfSense at the moment. Maybe in the autumn or winter, I’ll dig into some more and hopefully find some good angles to cover in future blog posts. I’m very happy you liked the post, thanks a lot for that, cheers!
Everything is very open with a clear clarification of
the challenges. It was really informative. Your site is very useful.
Many thanks for sharing!
You’re welcome, thank you.
Pretty nice post. I just stumbled upon your blog and wished to say that I have really enjoyed surfing around your blog posts.
In any case I’ll be subscribing to your feed and I hope you write again very soon!