Introduction
As some readers of this blog may know, I’m pretty happy with Oracle Cloud for learning, experimenting with and/or improving my cloud-skills and the reason is that it’s free and not only that: I feel I get a lot of free resources (up to 4 instances, 24 GB RAM and 200 GB space, see my previous blog posts about this). This blog post is obviously describing how I’ve found another way to utilize the free Oracle Cloud-resources (in addition to this self-hosted website). The intention is to inspire and I see four possible options:
- Opt for a free tier: https://www.oracle.com/cloud/free/ and leave it that way (NB: don’t misuse it).
- Upgrade the free tier to “Pay As You Go” (PAYG) which I did (don’t misuse it, because it’s still free!).
- Self-host on your (typically older, unused?) hardware and open up your firewall to the internet (allow in-bound traffic) via your router-admin configuration pages… You’ll pay for consumed electricity, but that’s probably still cheap…
- Use another Cloud provider of your choice (typically you’ll have to pay so I see this, as the most expensive option).
Notice that with OCI (https://www.oracle.com/cloud/) even though you’re a PAYG-customer in the system, you still don’t have to use any resources that costs anything. Therefore I’m emphasizing: Please don’t misuse the free resources and don’t leave instances running if they’re idle and not doing anything etc.
Next, it’s important to mention that in this blog post I’ll describe the initial steps of how to setup an email-server and run it for free via OCI (but you should be able to do everything with a normal Ubuntu-instance running wherever you want it to). I used “Ubuntu 22.04.2 LTS”…
Explanation of why I almost gave up and why care?
The reason I began looking into this topic is that my (soon previous) hosting-provider in 2022-2023 increased their prices much more than I think is reasonable (blaming it on the Ukraine-war, increasing energy-prices and inflation etc), so what can you do?
It’s not that I cannot afford it – I just thought it was/is unreasonable expensive and so I decided that I also wanted to experiment and learn new things. For this domain I don’t care about web-hosting because I have a very simple webpage and it’s also relatively simple to setup Apache/Nginx… It’s not so common to control your own mailserver (compared to a web-/ file-server), so I think this was an interesting and a good challenge for me. I began messing around with different solutions and arrived at Mailcow: “The mailserver suite with the ‘moo’“.
It doesn’t directly run on the OCI Ampere ARM 64-platform that I’m using so that caused me a lot of pain… It seems it’s primarily made for running on the AMD64-platform (also known as x86-64 or x64).
So you might ask: Doesn’t Oracle provide a free AMD64 instance you can use? They do and I actually have one of them, but that only comes with 1 GB of RAM where each of my 3 ARM-instances can have up to 24 GB of RAM in total (for free) – so each of my ARM-instances have 8 GB of RAM and Mailcow requires at least 6-7 GB of RAM… It took a long time to figure out how to run Mailcow on ARM, so also for that reason I think I needed to share my experiences and hopefully this can make things easier for other people in the same boat.
What this blog post will not cover…
Because I couldn’t make Mailcow work for the ARM-processor for several days I almost gave up and I began looking into other alternatives. Eventually however, I figured that Mailcow looked like the most promising of the mail-servers I wanted to run. And this is where I (maybe) made a mistake: I found a really cheap hosting-provider and moved my email and web-domain (not for this site) to that provider and I can live with that because setting up all the outgoing email mumbo jumbo is boring and tiresome and therefore the main limitation of this blog post is that I’ll not cover neither DNS nor outgoing email-setup (at least not this time).
With that decision I’ll be using a self-signed certificate which doesn’t work well for encrypted nor outgoing email communication… Sounds bad? Maybe – but I’m sure these things can be fixed relatively easy after the preliminary steps has been taken, which will be covered here and then it’s up to the reader if you want to continue where I left. NB: I’ll provide some hints later, because I did experiment with setting up outgoing email on OCI around 6 months ago.
About not covering the setup for setting up the DNS-records: It isn’t difficult to do yourself and you can easily find that information on Google (and ChatGPT probably also knows it, if you’re using that). Use key words such as: “outgoing email server setup”, “A, MX, CName, TXT, PTR records” and “ARC/DKIM key”.
Having a self-hosted Mailcow solution is more risky than using a hosting provider. Why should I setup DNS for my email-domain, when I just bought a 1-year cheap hosting-solution and that provider has a much more professional setup (automated backups, support etc)? With the paid solution I’m also pretty sure I don’t lose any emails and outgoing email is working right out of the box. On the other hand, self-hosting is a good way to learn things.
It’s up to yourself to decide if you want to continue along this path, but if you read through this guide and also take the extra steps with DNS for your maildomain and make it work properly with certificates and in-/out-going email, I’ll appreciate you write it in the comment-field with your remarks. WARNING: Be sure to test outgoing emails with e.g. https://www.mail-tester.com/ – it’ll help a lot… I might also continue this blog post later, perhaps just before my new 1-year hosting subscription runs out…
What I’m not covering here should hopefully not discourage people from trying to go for the full-fledged Mailcow self-hosted solution and I’ve seen a lot of people are really happy about Mailcow and it just runs, for years without problems…
I’ll also not cover anything related to IT-security in this blog post because I expect that Mailcow automatically e.g. has brute-force password protection and similar builtin by default – otherwise, please leave a comment and I’ll look more into it and possibly update this blog post.
Requirements / software dependencies
I’ll/we’ll be using:
- Git: https://git-scm.com/
- Docker: https://www.docker.com/ (and Docker Compose)
- Mailcow (the mailserver): https://mailcow.email/
- OPTIONAL: SOGo (webmail client): https://www.sogo.nu/
- Imapsync (to migrate IMAP accounts): https://imapsync.lamiral.info/
As mentioned, I’ve used a setup with a simple Ubuntu 22.04.2 LTS-server, but I think other versions and distributions including Debian, would probably work in a very similar way.
Installation procedure
Unfortunately I haven’t written down every detail but the following is the installation procedure I used (YMMV):
In general, you should follow the guidelines and steps from:
https://docs.mailcow.email/i_u_m/i_u_m_install/#installation-via-script-standalone which are:
- Install GIT
- Install Docker
- Install Docker-compose
I’ll not cover how to do these things because if you’ve read my blog posts and find them interesting I assume you know how to do these things – or can figure it out quickly. I’m also not completely sure if I did things exactly like described in the Mailcow documentation but at least I ended up having:
docker-buildx-plugin/jammy,now 0.10.2-1~ubuntu.22.04~jammy arm64 [installed,upgradable to: 0.10.4-1~ubuntu.22.04~jammy]
docker-ce-cli/jammy,now 5:23.0.1-1~ubuntu.22.04~jammy arm64 [installed,upgradable to: 5:23.0.2-1~ubuntu.22.04~jammy]
docker-ce-rootless-extras/jammy,now 5:23.0.1-1~ubuntu.22.04~jammy arm64 [installed,upgradable to: 5:23.0.2-1~ubuntu.22.04~jammy]
docker-ce/jammy,now 5:23.0.1-1~ubuntu.22.04~jammy arm64 [installed,upgradable to: 5:23.0.2-1~ubuntu.22.04~jammy]
docker-compose-plugin/jammy,now 2.16.0-1~ubuntu.22.04~jammy arm64 [installed,upgradable to: 2.17.2-1~ubuntu.22.04~jammy]
python3-docker/jammy,now 5.0.3-1 all [installed,auto-removable]
python3-dockerpty/jammy,now 0.4.1-2 all [installed,auto-removable]
It shouldn’t cause you too many problems to install neither Git nor Docker or Docker-compose. Next, we need to clone Mailcow-repository:
$ su
# umask
0022 # <- Verify it is 0022
# cd /opt
# git clone https://github.com/mailcow/mailcow-dockerized
# cd /opt/mailcow-dockerized
And we can generate the configuration:
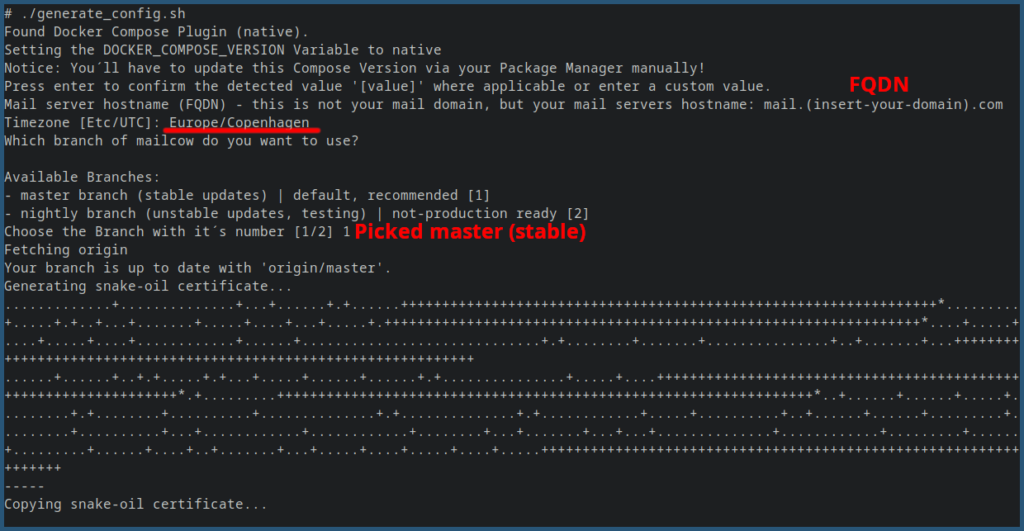
At this point, you should decide if you want to enable the SOGo-webmail client and I strongly recommend it – at least just try it out and you can later disable it again. Note that by default it’s disabled so you need to actively do something to make it work.
The webmail client “SOGo” also has a calendar and an address book but it’s the webmail client I’ve been using it for and I think it’s useful when we later perform mail migration of emails from an existing (old) mail-server to the new mail-server. If you decide to not use SOGo as webmail client, you can also setup e.g. Thunderbird or a similar mailprogram and I did try that too.
With Thunderbird however, I manually had to rightclick the account and click “Get messages” and accept a warning, so it would ignore missing encryption. This is a consequence of not having assigned the domain correctly via DNS yet and therefore Mailcow will use a self-signed certificate – not a big deal for what I did, but if you’re handling sensitive emails you also do not want unencrypted email communication. For testing that the mailserver works, I think having a missing trusted signed certificate is a good reason for just using the webmail client (no data is sent across the internet, when the webmail client runs on the mailserver ).
You enable the webmail-client by editing the “mailcow.conf“-file using an editor (I use vim, install what you prefer) and make the modification as seen below (SKIP_SOGO should be “n” for “no” to enable it, by default it’s “y” for “yes”):
# Skip SOGo: Will disable SOGo integration and therefore webmail, DAV protocols and ActiveSync support (experimental, unsupported, not fully implemented) - y/n

#SKIP_SOGO=y
SKIP_SOGO=n
I’m not sure I understand the reasons for not enabling SOGo but the comment says it’s experimental, unsupported and not fully implemented. For what I used it for, it worked perfectly fine those days I tested it. Also, it’s easy to disable again in case of unexpected problems.
Fixing platform-dependent Docker-image errors, using docker-compose.override.yml
At this stage, the official Mailcow-documentation tells us to:
docker compose pull
docker compose up -d
But that won’t work (try if you want). If you do this, you’ll notice 4 of the containers keep restarting every minute.
There is more than one problem here – the first problem has already been mentioned: That we need some images built for linux/ARM instead of linux/AMD64 and we need some extra packages installed. So you should do:
# First install some packages that allows us do some QEMU ARM-emulation:
/opt/mailcow-dockerized# apt install qemu-system-arm binfmt-support qemu-user-static
The next problem is that we need to downgrade some of the images – create a file named “docker-compose.override.yml” with the following:
/opt/mailcow-dockerized# cat docker-compose.override.yml
version: '2.4'
services:
  unbound-mailcow:
    image: quay.io/mailcowarm64/unbound
  clamd-mailcow:
    platform: linux/amd64
  rspamd-mailcow:
    platform: linux/amd64
  php-fpm-mailcow:
    image: quay.io/mailcowarm64/phpfpm
  sogo-mailcow:
    image: mailcow/sogo:1.114
    platform: linux/amd64
  dovecot-mailcow:
    image: mailcow/dovecot:1.21
    platform: linux/amd64
  postfix-mailcow:
    image: quay.io/mailcowarm64/postfix
  acme-mailcow:
    image: quay.io/mailcowarm64/acme
  netfilter-mailcow:
    image: quay.io/mailcowarm64/netfilter
  watchdog-mailcow:
    image: quay.io/mailcowarm64/watchdog
  dockerapi-mailcow:
    image: quay.io/mailcowarm64/dockerapi
  solr-mailcow:
    image: quay.io/mailcowarm64/solr
  olefy-mailcow:
    image: quay.io/mailcowarm64/olefy
We can now spin up all the containers, just as the official documentation told us:
/opt/mailcow-dockerized# docker compose pull
/opt/mailcow-dockerized# docker compose up -d
After a minute or two, you should now be able to access https://${MAILCOW_HOSTNAME_OR_IP_ADDRESS} with the default credentials: “admin” and default password: “moohoo” – except that probably you’ll get a certificate warning: “Your connection to this site is not secure” – I’ll assume if you’re interested in the stuff I write about in this blog, you’ll know how to ignore or handle this – or can quickly figure out how to solve this:
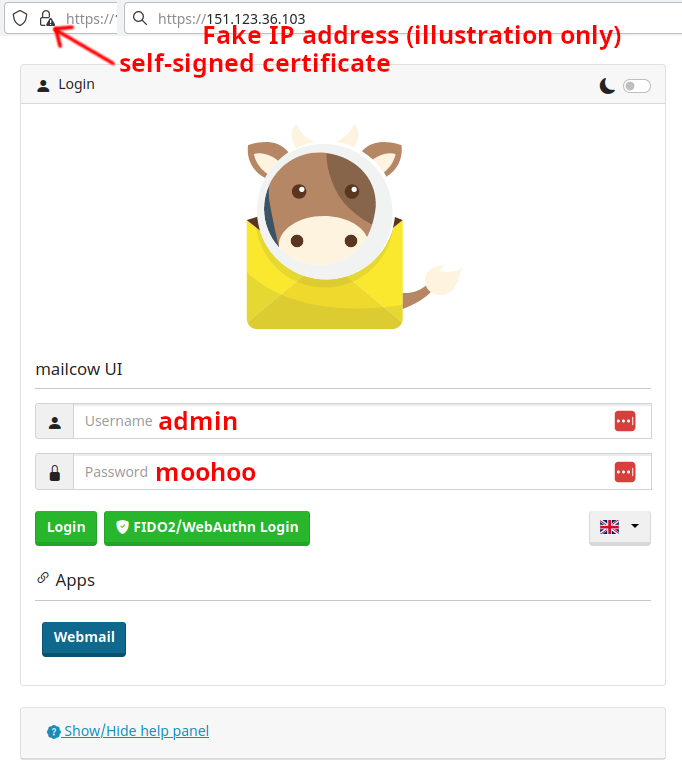
As you can see in the screenshot above, I accessed the mailserver directly via it’s IP-address – if or when or once you make the proper DNS-changes pointing to your domain, you should be able to access it via the domain-name that you provided in the Mailcow-configuration. Also, obviously, it doesn’t matter, which FQDN you gave it earlier, until (or if) you update your DNS-settings.
WARNING: Immediately after I tried to login, I noticed that nothing happened – I was redirected to “…/debug”, see below:

I’m not sure what the real issue behind the “empty debug”-login-page is – but it’s not something I investigated a lot. I found out that the solution is that one should replace “debug” with “admin”, then refresh the page and it’ll work.
NB: If you find a better solution or perhaps an explanation, please write it in the comments and I’ll update this blog post, thanks!
For testing the mailserver, I think this procedure is perfectly valid (without changing DNS yet). For real production I believe you can still do as described here and wait with the DNS-changes pointing to your domain, until all emails have been migrated. You don’t want to lose emails so you want to be sure you’ve setup all email accounts on the new server, before DNS changes are in place – also preferably you want all emails in place, when you decide to go live…
This procedure should hopefully have the effect that no emails are rejected or lost, until the new DNS-settings are applied and you can turn off the old mail-server. Until now, the email-server and accounts hasn’t been configured – we’ll do that now and also transfer (=copy) the emails from the old, to the new mailserver (=do the email migration procedure).
Email migration, configuration and working with the mailserver-UI
If you’ve arrived here and followed the steps I’ve described, you’ll now successfully have been logged into your new free mailserver. Congratulations: I think the worst is behind us!
Although I’m not using the Mailcow email-server for “production” (maybe in the future I will, however) I want to take this blog some extra steps ahead and explain what to be aware of and how to proceed, should you decide to use Mailcow in a similar way as outlined in this blog post:
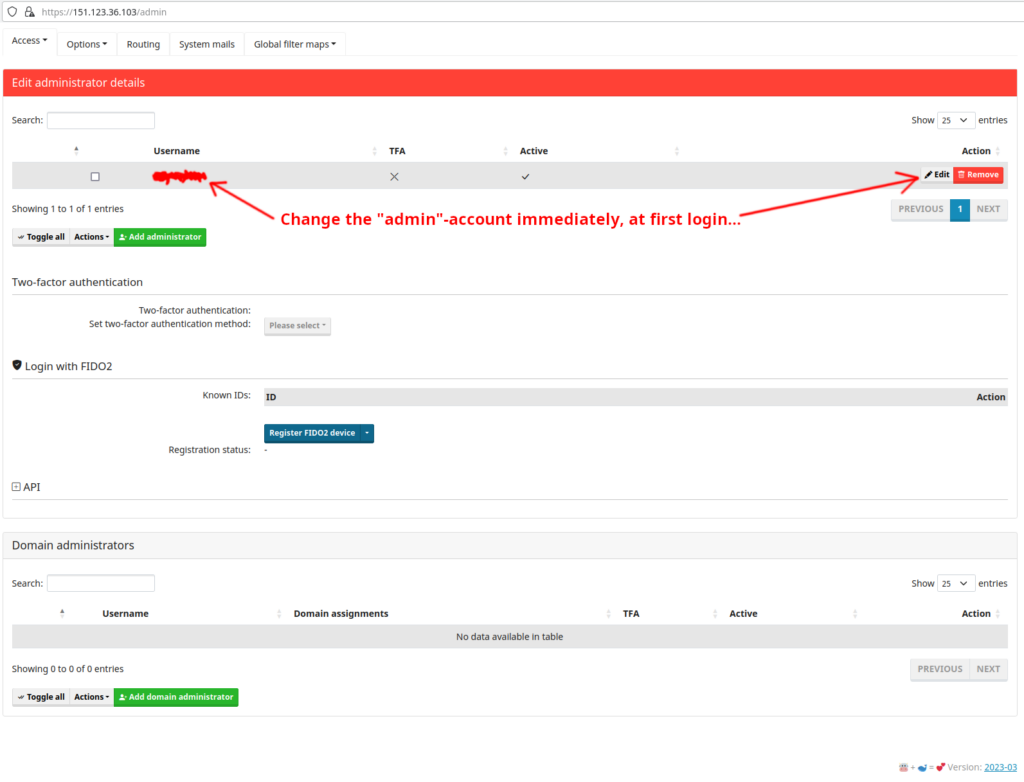
The user-interface helps us a lot and I find many of the options or settings to be pretty self-explanatory and user-friendly.
Setting up mailboxes (user accounts)
Before we can setup mailboxes, we need to configure the domain:

Once the domain has been configured, we can begin to add individual mailboxes (for each user on the system):
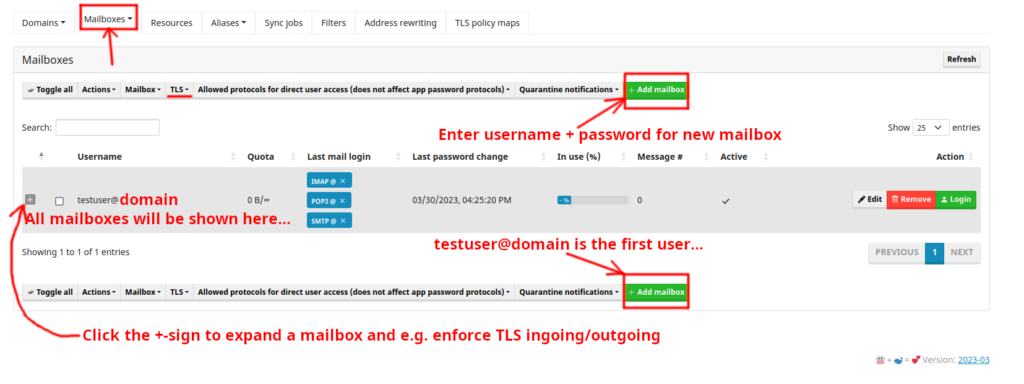
At this moment I think it’s very helpful to have enabled the SOGo-webmail client, because it’s now easy to test that the mailbox has been configured properly and works:
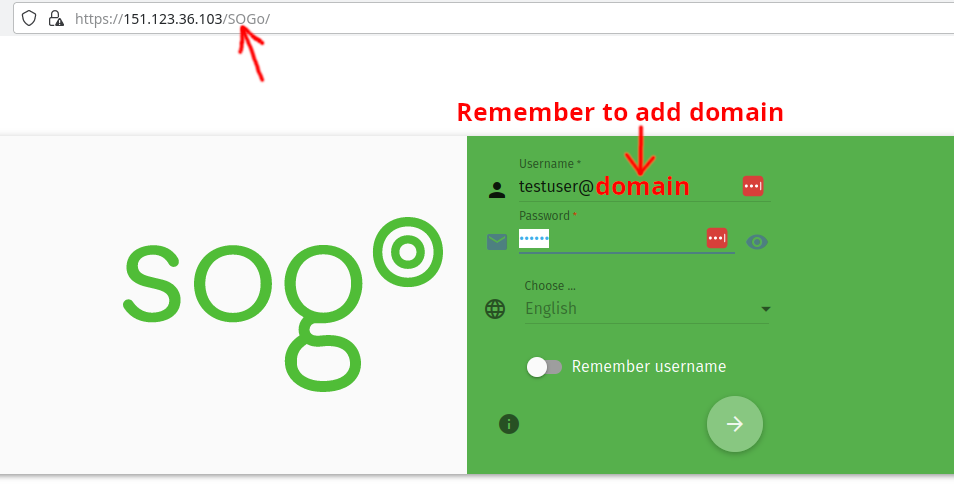
You should now try to login to the webmail client, if you enabled it via the mailcow.conf-configuration file above. Otherwise you should setup your mailprogram, e.g. Thunderbird to connect to the new mailserver.
Assuming you did as I proposed (you can always connect to your mail-program later), this is what we’ll see after logging into the webmail client:
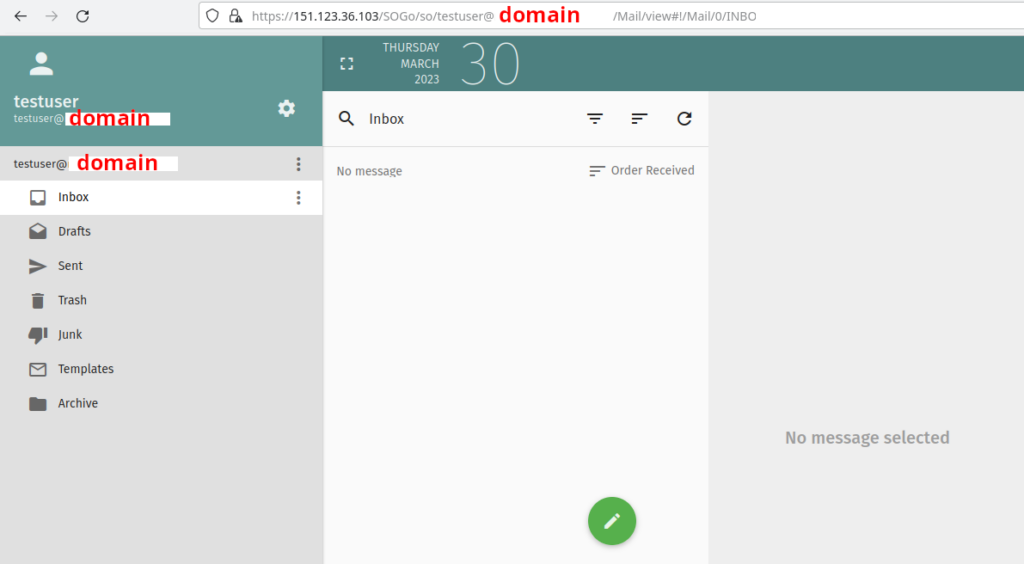
It looks pretty nice, doesn’t it? At least it looks like most other webmail client interfaces I’ve seen (the colors are just a bit different). The SOGo webmail client also has an option to show an address book and a calendar, but I’ve decided not to show these features here, mainly because I doubt that I’ll ever need yet another online calendar/address book besides what I already have in my mobile phone/email program…
Email migration using “sync jobs”
We now want to copy messages over from the old mailserver to the new mailserver. The easiest way to perform the email migration is to use the builtin “sync jobs”-feature:

After clicking the green button, one needs to fill out some information:
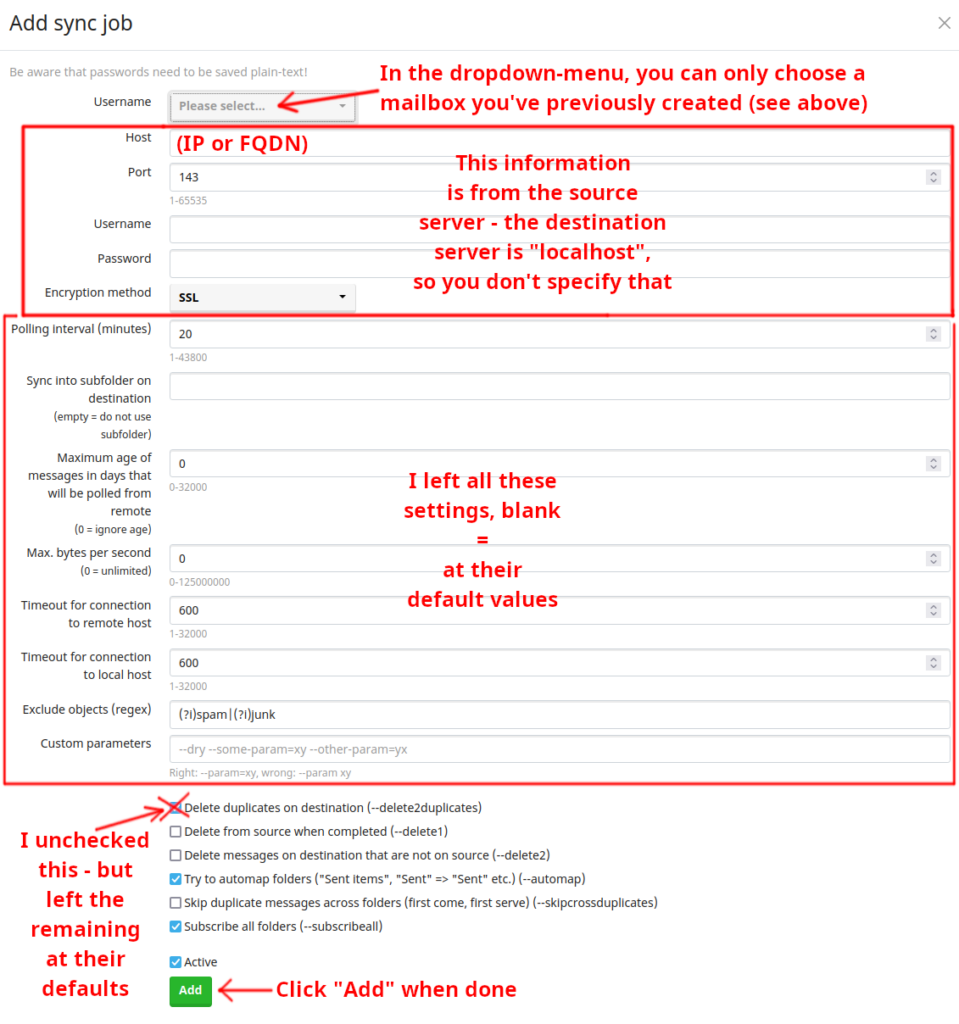
That information is the same as the “alternative method” described below and the reason is that both methods use the “imapsync”-tool.
Notice that it took a while, until I could see the job started (I cannot remember exactly what it did but suddenly it started). And after it completed, the job was still there so apparently it was set to periodically retrieve emails from the old mailserver and copy to the new mailserver. I ended up deleting the job so it didn’t kept polling the old mail-server.
If I weren’t testing I would either have kept the sync job for perhaps a week and/or manually keep an eye out for emails not arriving at the new mailserver. Finally, I would unplug the old mailserver, having given all DNS-servers a realistic chance to update their records with the new domain’s IP address (a day or a few days should be enough).
Email migration using “imapsync”
The “imapsync”-tool has a webpage at https://imapsync.lamiral.info/ and it describes itself as:
… a command-line tool that allows incremental and recursive IMAP transfers from one mailbox to another, both anywhere on the internet or in your local network. Imapsync runs on Windows, Linux, Mac OS X. “Incremental” means you can stop the transfer at any time and restart it later efficiently, without generating duplicates. “Recursive” means the complete folders hierarchy can be copied, all folders, all subfolders etc. “Command-line” means it’s not a graphical tool,
Gilles LAMIRAL, author of the Imapsync
So what is it and how does it work? I think it’s a well-tested and well-known program for doing exactly this task: Moving/copying emails from one server to another.
According to https://imapsync.lamiral.info/S/imapservers.shtml the tool has been reported to successfully work with at least 83 different imap servers, incl. Dovecot, Apple Server, Exchange Server, Gimap (Gmail IMAP), Hotmail, Office 365, Yahoo and several more. In order to use the tool, either you:
- use a free online version of the tool (I however did not test it – test on your own responsibility) – see: https://imapsync.lamiral.info/X/
- or download it and run it from your own computer (this doesn’t have to be a mailserver, a normal laptop is fine).
The reason I don’t like the free online imapsync-tools is that I don’t know if I can trust whoever is behind that webpage. I don’t know if they’ll keep a copy of my private emails and I just provided my secure login credentials with passwords… At least quickly change password after having used such a tool…
I recommend doing as I did: Download and install “imapsync” on a pc and specify source and destination servers (maybe you can install it on the mail-server and use localhost as destination, but I also didn’t try that). Once installed, the most basic thing one can do, is to query an IMAP server for it’s software name and version:
$ imapsync --host1 imap.gmail.com
...
...
Host1: probing ssl on port 993 ( use --nosslcheck to avoid this ssl probe )
Host1: sslcheck detected open ssl port 993 so turning ssl on (use --nossl1 --notls1 to turn off SSL and TLS wizardry)
SSL debug mode level is --debugssl 1 (can be set from 0 meaning no debug to 4 meaning max debug)
Host1: SSL default mode is like --sslargs1 "SSL_verify_mode=0", meaning for host1 SSL_VERIFY_NONE, ie, do not check the server certificate.
Host1: Use --sslargs1 SSL_verify_mode=1 to have SSL_VERIFY_PEER, ie, check the server certificate. of host1
Host1: Will just connect to imap.gmail.com without login
Host1: connecting on host1 [imap.gmail.com] port [993]
Host1 IP address: 142.250.147.108 Local IP address: 192.168.1.57
Host1 banner: * OK Gimap ready for requests from 101.94.73.38 b8mb128406701wrp
Host1 capability: IMAP4rev1 UNSELECT IDLE NAMESPACE QUOTA ID XLIST CHILDREN X-GM-EXT-1 XYZZY SASL-IR AUTH=XOAUTH2 AUTH=PLAIN AUTH=PLAIN-CLIENTTOKEN AUTH=OAUTHBEARER AUTH=XOAUTH AUTH
Host1: found ID capability. Sending/receiving ID, presented in raw IMAP for now.
In order to avoid sending/receiving ID, use option --noid
Sending: 2 ID ("name" "imapsync" "version" "2.229" "os" "linux" "vendor" "Gilles LAMIRAL" "support-url" "https://imapsync.lamiral.info/" "date" "14-Sep-2022 18:08:24 +0000" "side" "host1")
Sent 181 bytes
Read: 	* ID ("name" "GImap" "vendor" "Google, Inc." "support-url" "http://support.google.com/mail" "remote-host" "101.94.73.38" "connection-token" "b8mb128406701wrp")
  	2 OK Success b8mb128406701wrp
Exiting after a justconnect on host(s): imap.gmail.com
It’ll write a lot of information to the screen and the –host1 argument tells which “source” host to use. In this case Google present itself as a an IMAP-server with ID: “GImap” and then there are some host capabilities which we probably can and should ignore.
For doing migration, we need to add something more than “–host1 +sourceServerName” to the command-line. I recommend looking in the official manual https://imapsync.lamiral.info/README and/or just try something like this, which is what worked for me:
$ imapsync --nofoldersizes --addheader --subscribeall --automap --tls1 --host1 mail.myoldexpensiveprovider.com --user1 postmaster@myDomain.com --password1 BAD_PASSWORD_OLD_SERVER --port1 143 --host2 151.123.36.103 --user2 postmaster@myDomain.com --password2 BAD_PASSWORD_NEW_SERVER --no-modulesversion --noreleasecheckIn this example, assume the domain “myDomain.com” is pointing to the existing/old mailserver and my new mail-server IP address is 151.123.36.103 (it isn’t, but I also used that in the screenshots). So, “host1” is source and “host2” is destination – likewise for “password1” and “password2”. The remaining settings stem from when I first ran imacsync using the “sync job”-method so when I later did the same thing from the commandline I copy/pasted the commandline information which was used and which I knew worked.
All I had to do was therefore just to change a few arguments relating to –host2 (e.g. I added –user2 and –password2 arguments, because now I weren’t running imacsync on localhost). In any case, the commandline shown above is the one that worked for me so feel free to be inspired and do something similar.
I’ll not show all the output this command produces, but it’ll automatically log the output in a subdirectory named LOG_imapsync so you don’t need to pipe the output via “tee”, use Linux redirection or things like that.
Future steps about this matter
Obviously with this solution there’s no automated backup – you probably want to add that functionality if you have important mails stored.
If you want to be just a bit serious you also want to setup DNS and outgoing email so it passes the tests at https://www.mail-tester.com/ (and/or receives a high score). I currently have another instance running on OCI, which is running https://hestiacp.com/ – and in that regard, I remember I had problems with setting up outgoing emails and I think I remember that the reason was that the free OCI IP address range had IP-addresses with very bad email reputation in it.
This bad IP-address range automatically results in a low score using mail-tester.com. I remember I fixed that problem by using a free email-relay service (smtp-relay.sendinblue.com ; port 587), but that’s another story for another day. Outgoing email is cumbersome to setup but I know it’s possible to do it, because I’m doing it on another OCI-instance. This blog post describes the steps that are needed to get started, but I didn’t want to waste time on handling outgoing emails and DNS-records. An alternative to using e.g. sendinblue.com for SMTP relaying is probably to pay Oracle (or whoever you’re using) for getting access to a good IP address range, i.e. one that doesn’t have it’s IP address blacklisted (it’s a topic beyond the scope of this blog post, just mentioning it, if you’re heading in that direction).
In general, I don’t think it’s difficult so setup all the DNS and outgoing email-stuff. If you continue along this path and redirect your domain to the new IP-address, this will also enable you to get a proper valid authorized signed certificate for HTTPS-encryption and enable to you activate SSL-encryption and stuff. I’m just not going there this time because:
- I’ve already been there, done that – it’s not so fun to do things when you already know how to do it.
- I don’t need it until perhaps beginning of next year and when we get there, I’ll consider it and make a part 2 of this blog post (still with Mailcow I think).
- It just takes too much time to describe and would make this blog post unreasonable long.
PRO/BONUS TIP: In connection with moving my emails from my old hosted mail-server to the new hosted mail-server, I also changed the DNS-settings and sent some test-mails. I discovered that:
- Google GMail almost immediately picked up the DNS-changes (within a minute or so) and correctly delivered the emails to the new mail-server.
- I also tried that same thing with other mail-accounts whose mail-servers didn’t deliver to the new server until after several hours or half a day or something…
I think it was very interesting that I immediately could see that GMail was capable of quickly picking of DNS-changes and once I knew I could both send and receive, I knew everything was done correctly and I could relax and go to sleep, just wait for the remaining DNS-servers across the world to pickup the changed DNS-records…
Conclusion
In this blog post I’ve explained how you can setup a fully working email-server – however without going into the details about setting up DNS and outgoing email. The best thing about it is that it’s completely free and if you do like me you don’t even pay for the electricity bill! Isn’t that great?
As you might’ve realized by now, I think Mailcow is a great project and obviously you can also use the same method to freely host a web-server, which is even easier to do on the ARM-platform (and probably better supported)… I’m really happy that the issues I faced eventually worked out and that I figured out how to use the docker-compose.override.yml file to not only spin up Docker so everything works on ARM-CPUs, but also to downgrade the versions that otherwise were responsible for some weird errors (that I’ve luckily forgot all about now).
There were other minor issues I discovered along the way, but I encourage readers to test my setup, go through this blog post and write me a comment if you succeed or not and if this is useful. Also write me a comment if you think I need to describe something better, rephrase something, if there are better options available I didn’t or don’t know about etc – and thanks for reading this to the end.
29 replies on “How to get (setup and run) a totally free hosted email server in the cloud?”
Heya i am for the first time here. I found this board and I find It truly useful & it helped me out much. I hope to give something back and aid others like you helped me.
Hi. I appreciate the feedback, thanks a lot for that. It sometimes just takes an enormous amount of time, with a busy schedule but currently I think I’ve managed to post once per month. If you create a similar blog with interesting content, you’re more than welcome to drop a link with a comment so I can publish it and share it as a comment here.
Would you be concerned with exchanging links?
Hello. I just tried to contact you on the email address provided for this comment and I received: “Your message wasn’t delivered to XXXXX because the address couldn’t be found, or is unable to receive mail” and “The response from the remote server was: 550 5.5.0 Requested action not taken: mailbox unavailable….” – anyway, I understand the use of a fake mail address here and it’s perfectly fine, I’ll still publish the comment.
To answer the question: I’m relatively new to blogging and am only an amateur – just trying to learn some more things, play with wordpress, google analytics, SEO and stuff like that, maybe also more advanced things in the future (if I get time, let’s see). You asked about “exchanging links” – please write via the “Contact form” at https://mfj.one/contact/ and tell me more about exchanging links, if this is still relevant – I’m open to pretty much anything, if it makes sense. When you use the contact form, I’ll receive an email and if that email makes sense, I’ll reply to the comment and via email, feel free to write/elaborate, thanks!
I together with my guys ended up reviewing the best information and facts found on your web site and before long developed an awful suspicion I never thanked the blog owner for those tips. The young boys had been consequently happy to see all of them and already have honestly been enjoying them. Appreciate your genuinely really considerate and for making a decision on this form of terrific things millions of individuals are really desirous to discover. My sincere regret for not expressing appreciation to sooner.
That’s cool to hear, thanks a lot! Unfortunately I think I’m gonna have to speed things down a bit – I’ll possibly write a short blog post about that – but the site shall still continue 🙂
hello!,I love your writing so a lot! proportion we be in contact extra about your post on AOL? I require a specialist on this space to unravel my problem. Maybe that is you! Looking ahead to see you.
Hi. I’m not really an Oracle cloud specialist – but you and everyone else are welcome to write directly to me by using https://mfj.one/contact/ – otherwise I’ll assume that the comments are for the “public” and not for me privately/individually.
Oh my goodness! an amazing article dude. Thank you However I’m experiencing challenge with ur rss . Don抰 know why Unable to subscribe to it. Is there anyone getting identical rss drawback? Anybody who knows kindly respond. Thnkx
About the RSS-feed-issue: Are you using the “Feedbro”-extension? Which browser do you use (maybe try another browser, if you haven’t already)? I think the RSS-subscription-trick should work for all wordpress-sites (see e.g. https://wordpress.com/support/feeds/), so I think/believe it’s just a local issue. There are also other options, if “Feedbro” doesn’t work, but I haven’t tried them: Maybe check the options in the “How to Use RSS Feeds to Read Your Favorite Websites?”-section at https://www.wpbeginner.com/beginners-guide/what-is-rss-how-to-use-rss-in-wordpress/ – please provide feedback if it helps (I hope it does)!
This article is a goldmine of information. The author has covered all the important aspects of the topic and provided valuable insights that are hard to find elsewhere. I appreciate the clarity of explanations and the practical examples that make the content relatable. Well done!
Appreciate the feedback, thank you.
Очень хорошо организованная статья! Автор умело структурировал информацию, что помогло мне легко следовать за ней. Я ценю его усилия в создании такого четкого и информативного материала.
I used google translate to understand this: Thanks a lot for the positive feedback and for letting me know that the content is useful!
Thank you for another wonderful article. Where else could anybody get that type of info in such an ideal way of writing? I’ve a presentation next week, and I’m on the look for such info.
Я хотел бы выразить признательность автору этой статьи за его объективный подход к теме. Он представил разные точки зрения и аргументы, что позволило мне получить полное представление о рассматриваемой проблеме. Очень впечатляюще!
With the help of google translate, I understand this comment – thanks, appreciate the feedback!
Эта статья является настоящим сокровищем информации. Я был приятно удивлен ее глубиной и разнообразием подходов к рассматриваемой теме. Спасибо автору за такой тщательный анализ и интересные факты!
You’re welcome and thanks a lot (interesting to see feedback in Russian, according to google translate)…
Я хотел бы выразить свою благодарность автору этой статьи за исчерпывающую информацию, которую он предоставил. Я нашел ответы на многие свои вопросы и получил новые знания. Это действительно ценный ресурс!
Автор старается подойти к теме без предубеждений.
Эта статья действительно отличная! Она предоставляет обширную информацию и очень хорошо структурирована. Я узнал много нового и интересного. Спасибо автору за такую информативную работу!
You’re welcome – although I don’t really understand why you (and others) post in Russian instead of in english, if you read the content.
Pizzaria Pizza Salvador Bahia Rio Vermelho Brasil Delivery http://www.vilaitalia.com.br
You helped me a lot by posting this article and I love what I’m learning.
Insightful piece
This is quality work regarding the topic! I guess I’ll have to bookmark this page. See my website Webemail24 for content about Wealth Management Solutions and I hope it gets your seal of approval, too!
For anyone who hopes to find valuable information on that topic, right here is the perfect blog I would highly recommend. Feel free to visit my site Seoranko for additional resources about Relationship Therapy.
Hey there, I appreciate you posting great content covering that topic with full attention to details and providing updated data. I believe it is my turn to give back, check out my website 48U for additional resources about Cosmetic Treatment.