Introduction
I’ve been using Clonezilla (a small bootable GNU/Linux distribution) for doing full harddisk backups (images) for perhaps more than 10 years (I don’t remember it, but a long time). Making a simple Clonezilla backup image is too simple a task to write a blog post about. Recently I did something which for me is a bit unusual and I consider it to be a more advanced task than one would typically use it for. Why was this task “semi-advanced”?
I think this is the first time I remember I manually had to calculate the partition boundaries and customize the partition table – and that I think is interesting to write about. I did several mistakes and I’ve therefore decided I want to write a blog post with all the mistakes and the solution I came up with, to support this excellent free open source tool. If you know of a better free open-source tool than Clonezilla that can do the same (or anything better), please write in the comments section (but I think it’s the best free tool for me, at least). Clonezilla describes itself as:
“Clonezilla is a partition and disk imaging/cloning program similar to True Image® or Norton Ghost®. It helps you to do system deployment, bare metal backup and recovery.”
From the Clonezilla webpage
The use case: Upgrade the mechanical hard-disk in an old PC to SSD
I usually handle IT-related tasks for my parents private computer setup. The PC they currently use is an older one I gave them around ~2 years ago and it replaced an older PC running with an Intel i3 processor, which is now probably around ~4-5 years old. For a long time, this older PC had become unbearable slow and for probably 2 years or so it’s just been turned off and doing absolutely nothing – not even receiving the latest Windows updates. People don’t want to work with a computer that takes several minutes to boot up and even after it has booted up, it still takes a minute or two before you can open up a web-browser or begin to work. I know from experience that significant speed increases can easily be obtained just by swapping the mechanical hard drive out with a newer, modern SSD-drive.
The reason: Mechanical hard drives can typically transfer data at speeds from 80 MB/s to 160 MB/s, while SATA SSD’s offer speeds of 200 MB/s to 550 MB/s and an NVMe M.2 SSD disks can deliver speeds from ~5000 to 6500 or 7000 MB/s. I bought a cheap Kingston SSDNow A400 SSD – 240GB which I checked the specs on and it has read speeds up to 500 MB/s and write speeds up to 350 MB/s. By the way, in case you’re wondering: The screenshots collected below are all made using my KVM over IP-setup aka my BliKVM Raspberry Pi CM4-solution described in https://mfj.one/2023/01/why-and-how-i-use-kvm-over-ip-with-the-blikvm-box-based-on-the-raspberry-pi-compute-module-4/. Now, let’s get started…
The mechanical 1 TB drive – before partition modifications
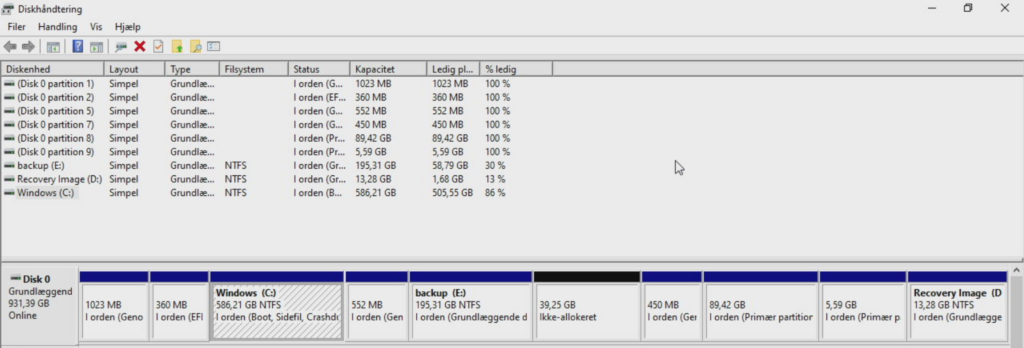
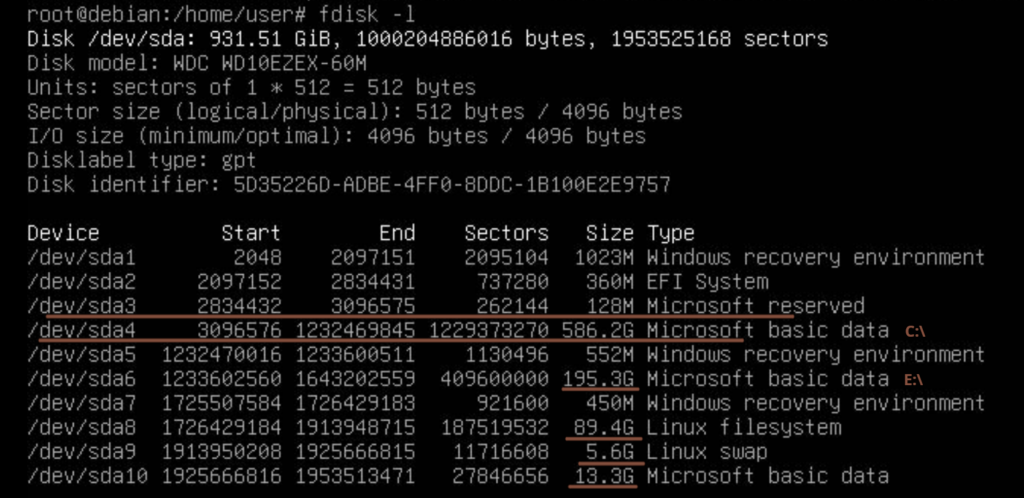
The most important partition of the original (source) disk is the (NTFS) C:\ Windows drive, which took up almost 600 GB. Furthermore, this disk had space for an additional (NTFS) E:\ partition, taking up almost 200 GB. I also once installed a Linux-partition taking up around 90 GB with a corresponding linux-swap disk taking up almost 6 GB (ignore that the language is not english):
If we boot up in Linux, this is the same partition table information:
The task is to resize all the partitions with data we want to keep, so the sum of all data can fit on the smaller ~240 GB SSD drive. In general it’s easy to expand a partition if there’s free space around it – and more difficult to shrink, but it can be done. In general for Windows, one has to go to “My Computer” and select “Management”, In the Computer Management then click “Disk Management”, right-click the partition and choose something like “Resize Volume” or maybe even “Shrink Volume”.
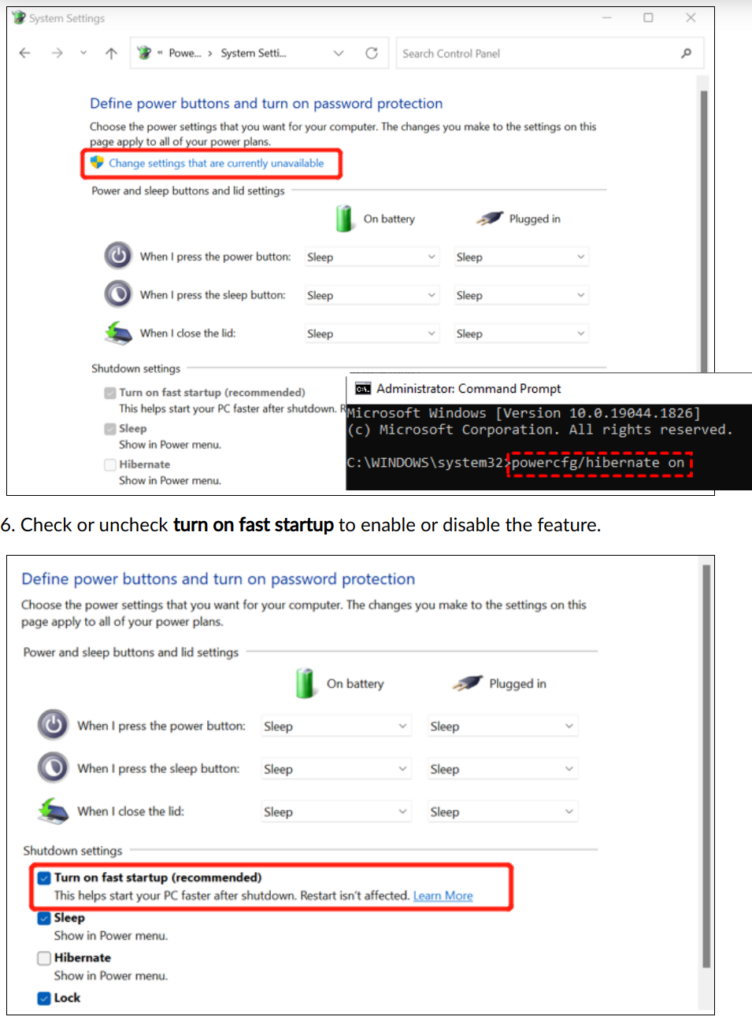
I had some problems, but those were solved by googling for “cannot shrink windows volume” (or similar). As I remember it, I think my problems were that at end of the volume, I had a hibernation file, page file(s) and possibly system volume information folder used by the System Restore. So I turned off System Restore (try running “systempropertiesprotection.exe” and “Disable system protection”), I disabled the use of a hibernation file: (run “powercfg /hibernate off” in a Windows administrator cmd-console window) and I also think I disabled “fast boot”. After doing these things I could shrink the C:\-volume.
The mechanical 1 TB drive – after partition modifications
The result was the following partition layout:
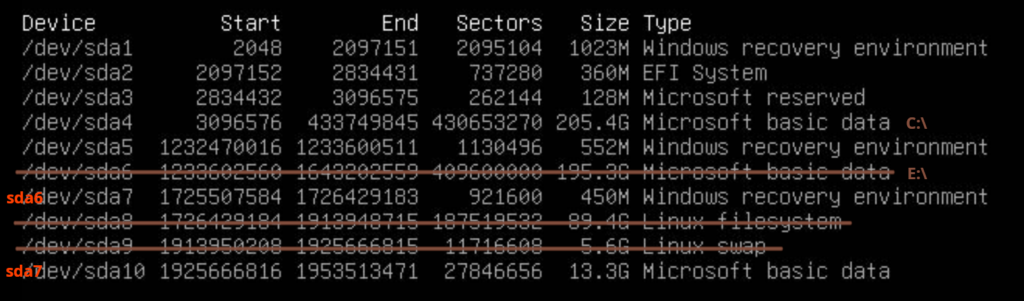
I decided I didn’t want the E:\-drive (sda6) at all and also would like to exclude the two Linux-partitions sda8 and sda9. I didn’t do any calculations but just by looking at this I thought to myself that it looked good, because if I roughly sum up all the numbers of the partition sizes I want to keep, that should be able to fit on at ~240 GB SSD disk. But I made a stupid mistake here – the “End”-sector is already outside the physical disk boundaries, which I didn’t realize until later… If I have to do this in the future, I think I might as well have begun calculating the precise partition boundaries to use and also verify that the last “end”-sector fits within the total disk boundary, but more about that later…
With the new partition layout on the new SSD-disk, I would end up having sda6 for Windows recovery environment (instead of sda7) and sda7 would become the 13.3 GB “Microsoft basic data”-partition – which I suspect is also where the Windows recovery image is stored.
Using Clonezilla to backup and restore
I didn’t write down all the steps here, for doing the backup because that part should be relatively trivial and I think it can be done using the “Beginner”-mode – just create an image of the whole harddisk. When the image has to be restored things become more complicated and I’ll add some extra detailed screenshots to explain about the errors I did and what I should remember if (or when) I’ll do something like this in the future.
Creating the disk image from the mechanical hard-drive as source-disk
For people not so familiar with the Clonezilla-tool, I think these are roughly the steps needed to create a backup-image of the harddrive:
- Create a bootale USB-stick with Clonezilla (or as me use BliKVM, PiKVM, IPMI or similar so you can mount a virtual DVD-drive to boot up Linux with Clonezilla from).
- In the boot-menu choose the default Clonezilla live CD/USB-setting (I think it’s called “Default setting, VGA 800×600” or similar).
- Choose language and keymap settings – either use defaults or as you prefer it.
- Choose something like “Device-image” – (to work with disks or partitions using images).
- Choose something like: “Use local device (E.g.: hard drive, USB drive)” – and follow the instructions. In my case, this is also where I plugged in my external USB hard-drive, which I used for storing the disk backup image to.
- You need to choose the proper disk and directory, for the image such that it appears as mounted under /home/partimag – which is where the clonezilla image data must be for things to work.
- Select something like “Savedisk Save_local_disk_as_an_image” and input filename for the saved image.
- Select the source disk for full disk back up. In my case I usually also choose “Skip checking/repairing source file system” because it makes things slower and if there are disk errors, what can we do about it? Usually, the operating system is capable of fixing itself so I personally don’t remember any situation where it helped me to check/repair the source file system, at this point in the process. If you suspect your disk is failing, yes, maybe you could opt for this disk-check, just to get a warning and be notified if there are problems. If your disk is in bad shape you’re screwed no matter what and should replace it soon…
- I also don’t check the saved disk image, because I usually don’t have disk problems and if it happens, I usually deal with them later. I usually throw bad disks away very quickly, because I cannot and don’t want to live with bad or unreliable disk drives – but if you have time or think it’s a good idea, I think the default setting is to check the saved image (see screenshot below).
- Now start the full disk backup and wait for it to finish. In case anything goes wrong, rest assured that now we have a full disk backup and can always go back and restore all data. But the idea is that now we don’t have to modify the source disk any longer, as the new SSD should replace the old mechanical drive completely and we’ll use the written image instead of the original harddisk, from now on…
I don’t remember the exact details, but I think I took this screenshot at the end of the backup procedure:
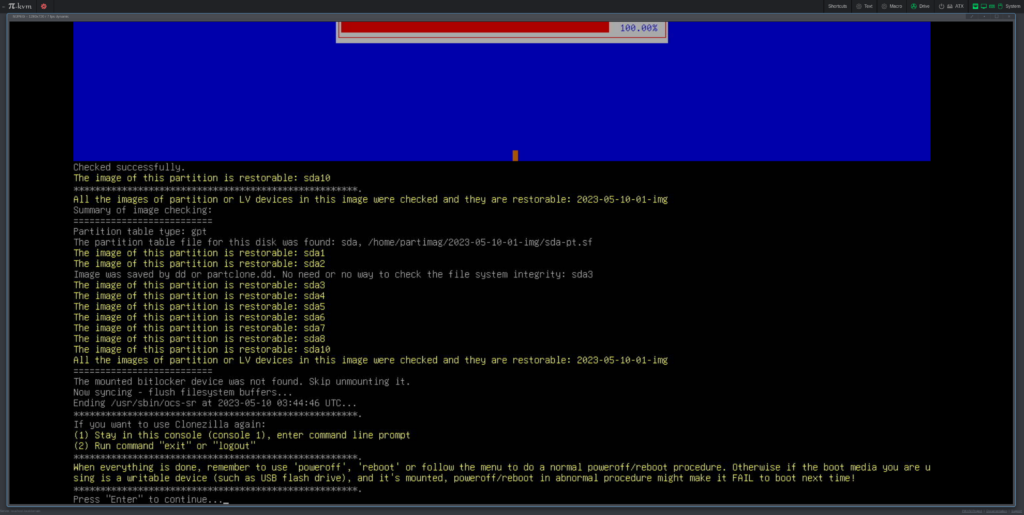
This screenshot tells us that it didn’t make an image of sda9 – which was the Linux swap-partition (that makes pretty good sense). It also says: “All the images of partition or LV devices in this image were checked and they are restorable“. It’s up to you if you want to check the disk image and apparently I in this case chose to check the image after it had been written. So far things have been relatively easy – it’s just a plain full-disk “vanilla” backup that has been made.
Restoring requires a an extra effort and this is very things become “semi-advanced”: We need to mess with the partition table information (notice the message: “The partition table file for this disk was found: sda, /home/partimag/2023-05-10-01-img/sda-pt.sf, we’ll use this shortly). Clonezilla now asks you what you want to do and you want to power everything off. Unfortunately this old PC only had place for a single SATA harddisk, so I had to replace the old mechanical drive with the new SSD harddisk. I/we’ll keep the old 1 TB mechanical harddisk and use it for e.g. backups in the future in another computer – no need to throw it away and it isn’t worth much on e.g. ebay.
Restoring the disk image data to the new SSD hard-disk
With the new SSD-harddisk plugged in and also with a USB-cable connected to my portable harddrive containing the stored image, I now booted up Clonezilla again (do it either via a physical USB-stick or use a virtual cd/dvd-rom drive, if your system/setup supports that):
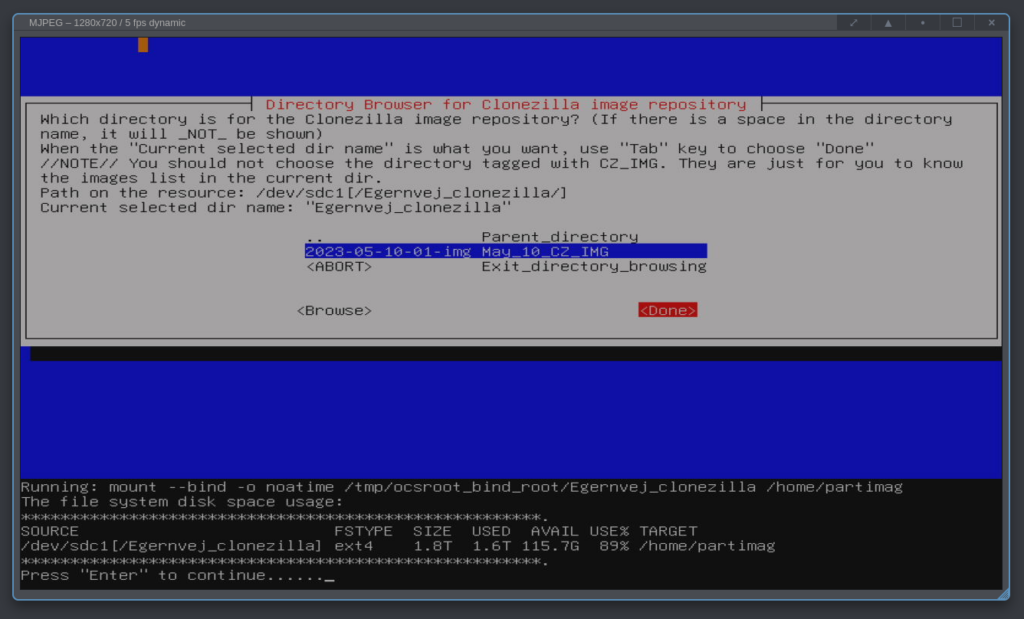
We now want to restore from the image and at some point you need to select the image file directory to mount in the /home/partimag folder. The screenshot above shows that I have a 2 TB disk known as /dev/sdc1 and on that disk I made a subdirectory called “Egernvej_clonezilla“, for the image. The image itself is called a default name: “2023-05-10-01-img“, telling the user the image creation date. After clicking “Done“, this image becomes mounted as /home/partimag, which is where Clonezilla expects backup images to be stored to and also backup images to be read from.
I ignored that I knew at some point an error would most likely tell me something I had to react on. I selected the partitions I wanted to restore and clicked enter:
First attempt – the “naive” approach
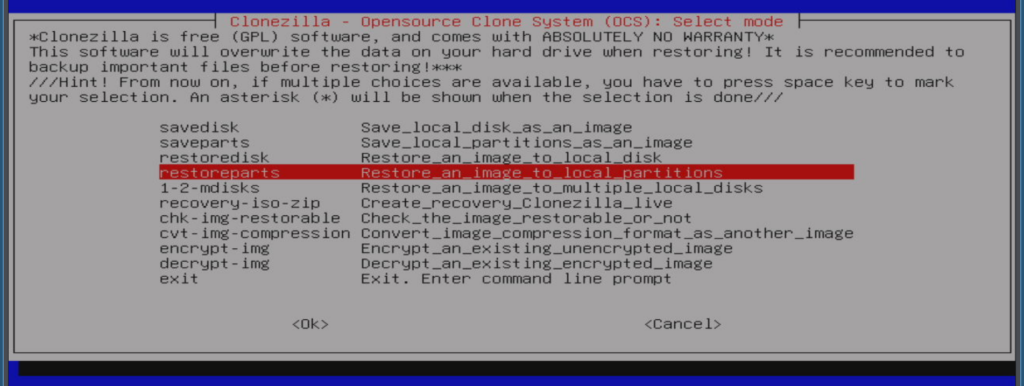
I chose “restoreparts” from the menu:

And received the error message: “Two or more partitions from image dir were selected. Only the same partitions on the destination disk could be restored“. I suspected things would fail, because I just used the default settings all along. I think the error message is a bit confusing so I tried to google and search for it to understand things better and it came up with a Github-link, showing parts of the program source-code:
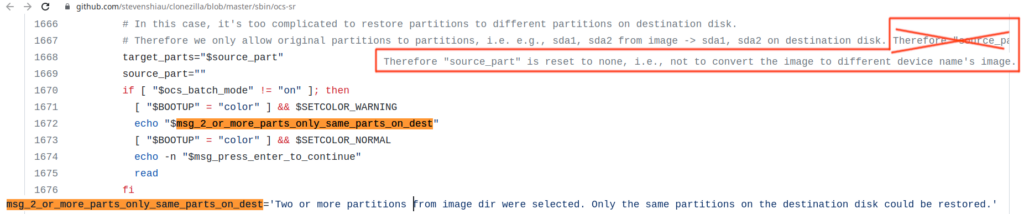
The comments to the source code reveal some extra information, to better understand the error:
In this case, it’s too complicated to restore partitions to different partitions on destination disk. Therefore we only allow original partitions to partitions, i.e. e.g., sda1, sda2 from image -> sda1, sda2 on destination disk.
Comment from https://github.com/stevenshiau/clonezilla/blob/master/sbin/ocs-sr – the source code for the Clonezilla commandline tool to save to or restore from images.
I’m guessing that it’s trying to tell us that “you can only restore the exact same partitions that also were on the source disk” and I’ve deliberately told it to exclude sd6 and sda8 – so I need to go back and do something else…
Second attempt (using options “-k1” and “-icds” in “expert mode”)
The “naive” approach didn’t work. We need to use some “expert”-settings. I googled and found https://drbl.org/fine-print.php?path=./faq/2_System/119_larger_to_smaller_disk_restore_clone.faq#119_larger_to_smaller_disk_restore_clone.faq:

The screenshot above explains there are 2 methods. The first is the simplest – but won’t work, because it requires that “… the used data blocks on the source disk are within the disk boundary of destination one“. The meaning of these options is shown below (I have combined 2 screenshots below, to a single image to save a bit of space):
I suspected that method 1 wouldn’t work and because I rarely use the “expert settings” I was curious to see what happened if I ignored the prerequisite of having data blocks on the source disk, to fit within the boundary of the destination disk:

After a while, this came up:
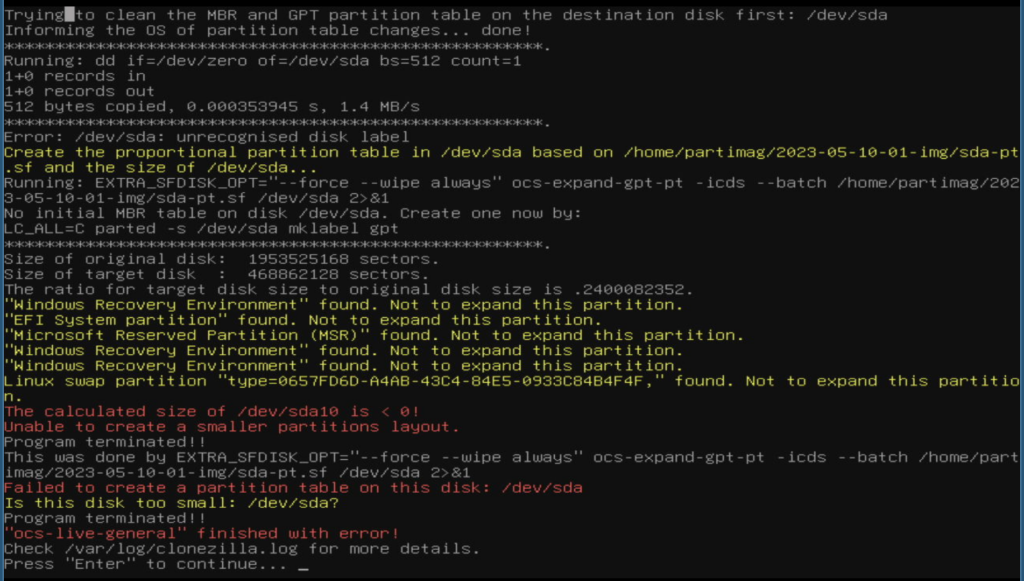
The red error messages tell that “The ratio for target disk size to original disk size is ~0.24” and it also tells that it cannot create a partition table on /dev/sda.
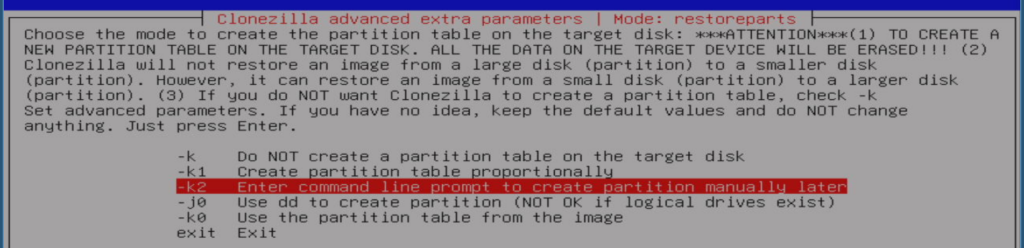
Remaining attempts (using option “-k2” to create the partition table manually)
I realized Clonezilla could not guess what it is I wanted and I need to specifically tell it how to create the partition table, which I can see requires running with the “-k2”-option (“create partition manually”):
After a while, this came up:
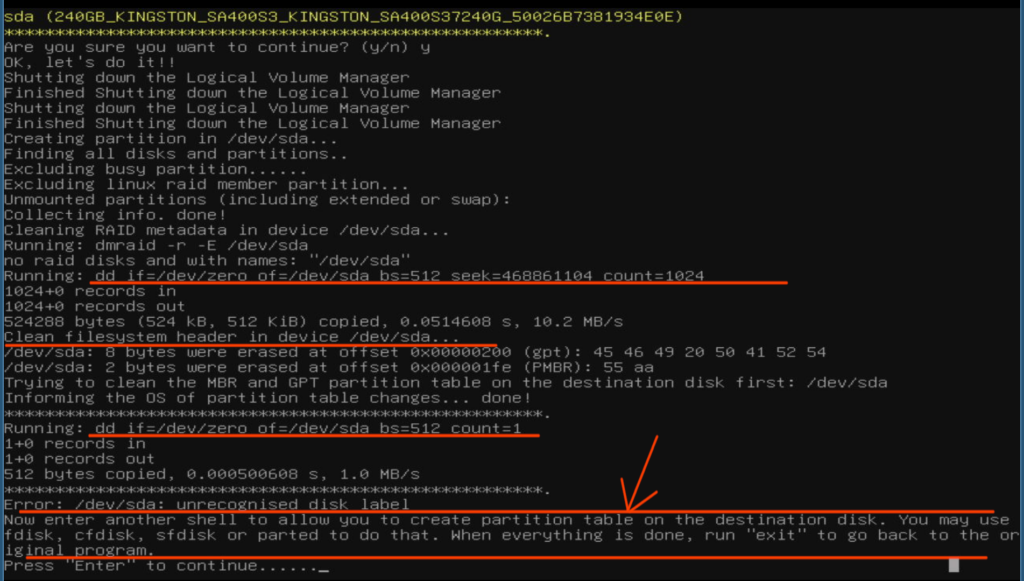
It tells us that it wipes some filesystem header information, drops you to a shell and asks you to fix the partition table before exiting.
First attempt at creating the partition table
While creating the image, the Clonezilla tool stored the original partition table information in different files, e.g. a text file called “sda-pt.sf”: I copied the file and modified it, more or less as shown below and this is where I began making some stupid mistakes which made me think I might as well write a blog post about my mistakes and maybe it can help someone else in the future:
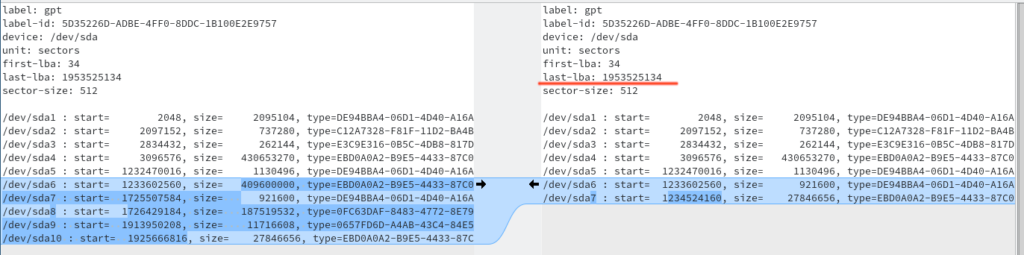
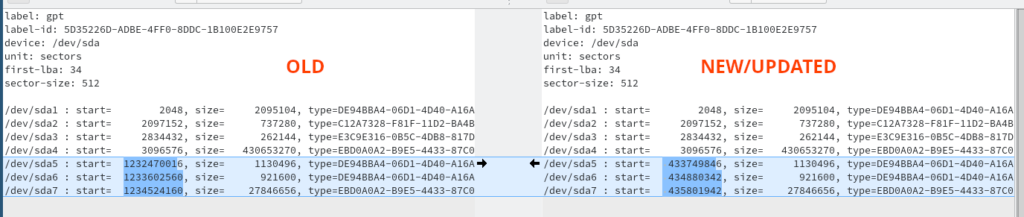
I didn’t want sda{6,8,9} from the old drive (shown to the left, i.e. this is “sda-pt.sf”, the new partition table text file is shown to the right). When the excluded partitions are not included in the new partition layout, the remaining partitions moves up so sda6 on the new drive becomes sda7 on the old and so forth. The partition boundaries has to be calculated in order to ensure that every partition at least can hold the size of the data from the backup, used for creating the image. It’s easy to do using the “start”-sector and the “size” which each has a column in the “sda-pt.sf”-text file.
For each partition, the start sector plus the size gives the offset for the next start-sector (at least that’s the idea unless there is unused space between partitions). People who are more experienced than me can already see I did a stupid mistake here by not modifying the “last-lba” value and also by keeping the huge start sector offset on sda5, which came from the original, unshrinked partition table. There is simply not enough space for this partition layout to fit on the smaller 240 GB SSD-drive and it took me quite some time to understand this error and what I should do:
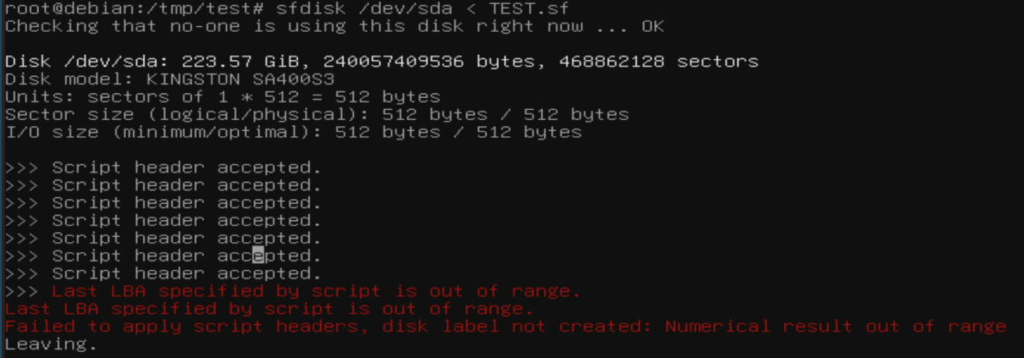
For writing the partition data to disk I used “sfdisk /dev/sda < TEST.sf“, where TEST.sf is a simple text file with the new partition table information (the contents are shown above). I couldn’t understand the error message because I was focused on the “Last LBA specified by script is out of range” – which was also a mistake:

I found two methods to output the maximum LBA (Logical Block Addressing):
- Using the contents of /proc/partitions
- Using “fdisk -l”
Luckily both methods gave the same value as shown in the screenshot above. I tried to insert this value in my “TEST.sf”-file and again I got the same error message. I then subtracted 1 from the “last-lba”-line and I think I got the same error message (which I think is weird, but maybe I’m misunderstanding how to use this line – if you know it, please drop a comment and I’ll update this). Finally I deleted the whole line and this helped, because now I got:
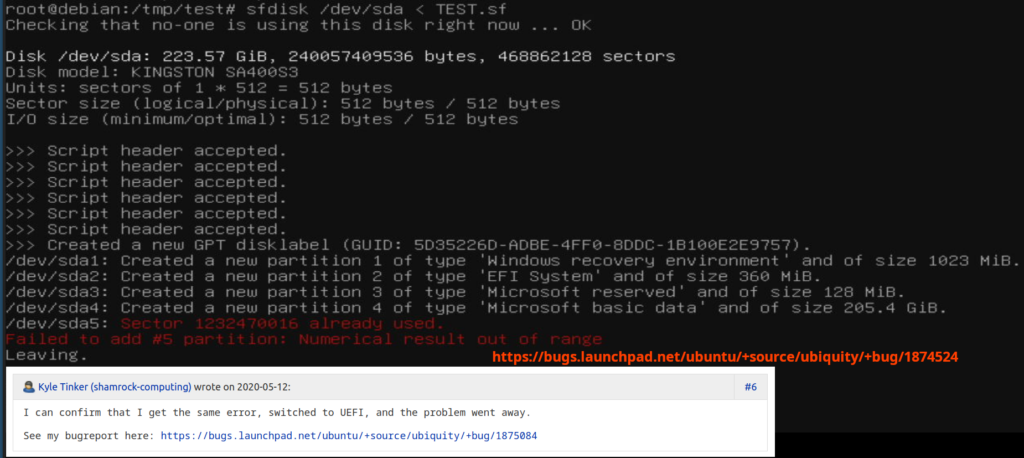
The message: “Sector XXX already used. Failed to add #5 partition: Numerical result out of range” is a new error and therefore a new problem had to be solved. Unfortunately, I got myself completely confused because I didn’t see the real problem and found a bug report saying that I should reboot in UEFI-mode and the error would disappear. So I did that – booted from an Arch Linux USB-stick – but I still got the same error message…
creating the partition table – The right way…
I discovered that I made a stupid mistake, which is best illustrated with the screenshot below:
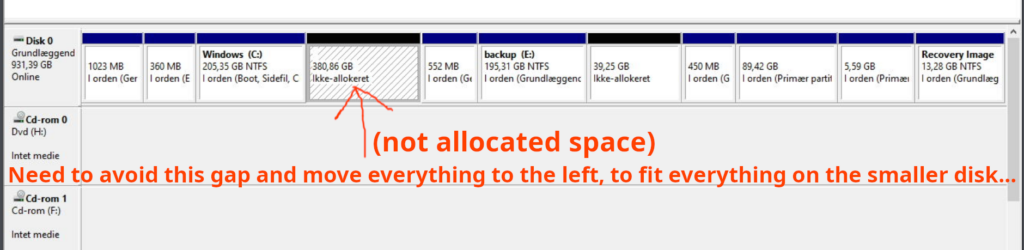
On the original disk I correctly did shrink the Windows C:\-partition – but I didn’t taken into account that there is now 380 GB of free/un-allocated disk space, before the remaining partition data. I knew I had never tried this with Clonezilla but I had a feeling it could handle it, because it’s such an old, well-tested free Linux-tool. I modified my partition data text-file:
I cannot modify the “size” of each partitions because there is not enough space to increase it and I cannot decrease it, because I cannot restore the image if it doesn’t fit on each partition. The solution is therefore that I should modify the start-sector so there’s no free or unused space, between the partitions – this is simply “wasted space” and this is how I made everything fit into the new SSD-disk.
By the way, maybe it would’ve worked if I now inserted the “last-lba”-line – but I thought to myself that if there are no errors or warnings, Clonezilla and/or “sfdisk” would figure out what needs to be done so things are working (please write a comment if you know about this and have something relevant to add). I also made myself a small partition-validation one-liner command, which I’ll copy/paste here so it can easily be copy/pasted in the future, should you decide to use this information yourself:
IFS=$’\n’; for l in $(cat TEST.sf|grep -i start |awk ‘{print $4,$6}’|tr ‘,’ ‘ ‘); do start=$(echo $l|awk ‘{print $1}’); sz=$(echo $l|awk ‘{print $2}’); next=$(($start + $sz )); echo “l=$l ; start=$start; sz=$sz; next=$next”; done

The command output is so I could easily and automatically compare the partition boundaries with the contents of my partition data text input file and see if I had made a wrong calculation somewhere. I could now write the partition data to disk.
I didn’t try writing the partition data to harddisk from within Clonezilla, because it didn’t boot in UEFI-mode. To be safe I did it from within Arch Linux, booted from a USB-stick in UEFI-mode (if this was not needed, please write a comment but I think it probably was needed). This is how it looked:
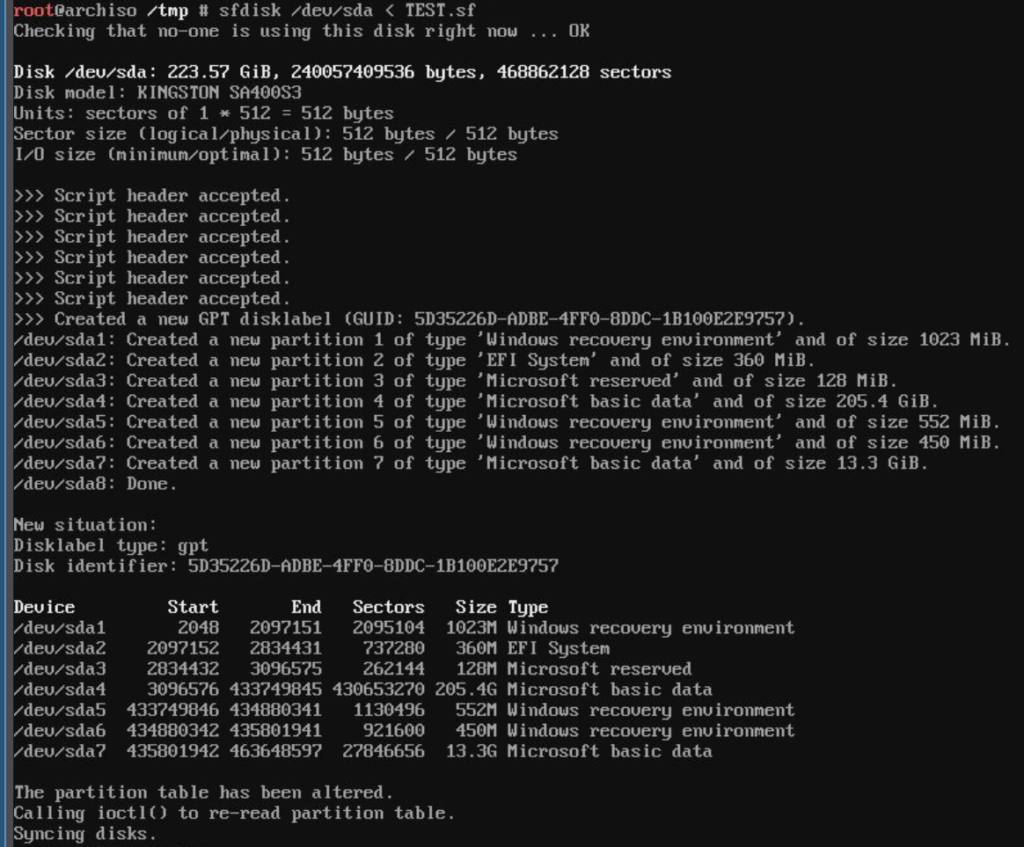
No errors – everything looks good now! Now is the time to shutdown Arch Linux and reboot into the Clonezilla environment…
Restoring the data – final attempt (using options “-k” and “-icds” in “expert mode”)
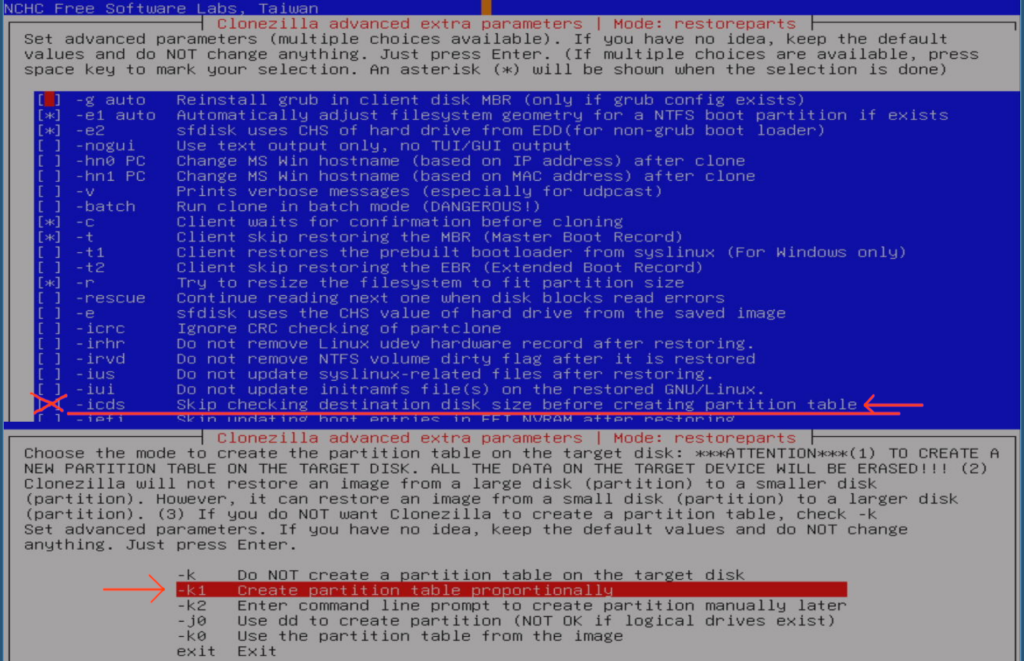
With the fixed partition table written to disk, I wanted to see if Clonezilla understood what to do next. I used the “-k” option meaning “DO NOT create a partition table on the target disk” (because we just manually wrote that and Clonezilla couldn’t understand what to do without us doing it) and “-icds” meaning “Skip checking destination disk size before creating partition table“. These were the settings I thought made most sense to use and this is how it looked (I again combined two screenshots into a single screenshot to save a bit of space):
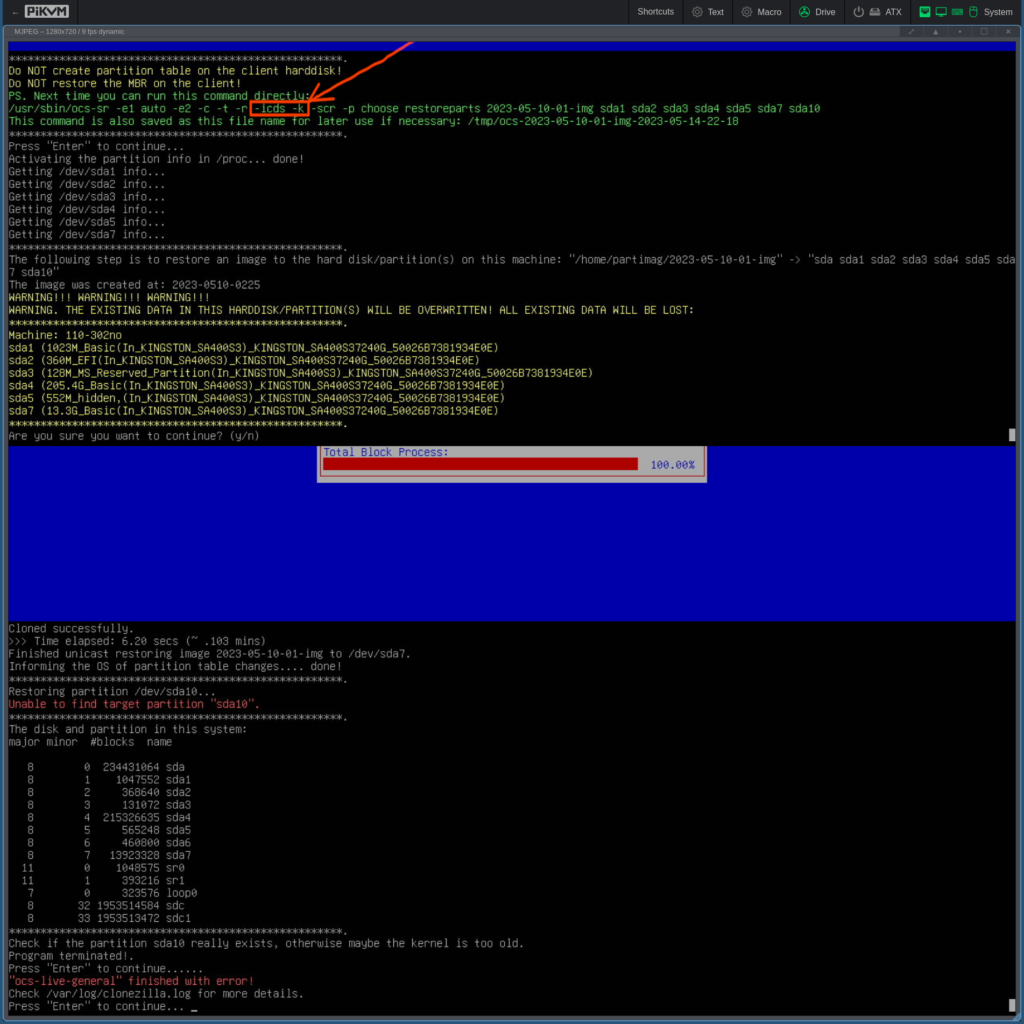
It’s a bit weird that it came up with these two error messages (in red): “Unable to find target partition ‘sda10’” and “… finished with error!” – hopefully I didn’t screw up my screenshots. If anyone reading this can explain why it wrote this error message or if I made a mistake, please write a comment below…
But except for that I felt good – it must mean everything up until sda10 went ok, so I tried to shut down everything and boot up and see if it worked…
Fixing everything so it boots up correctly…
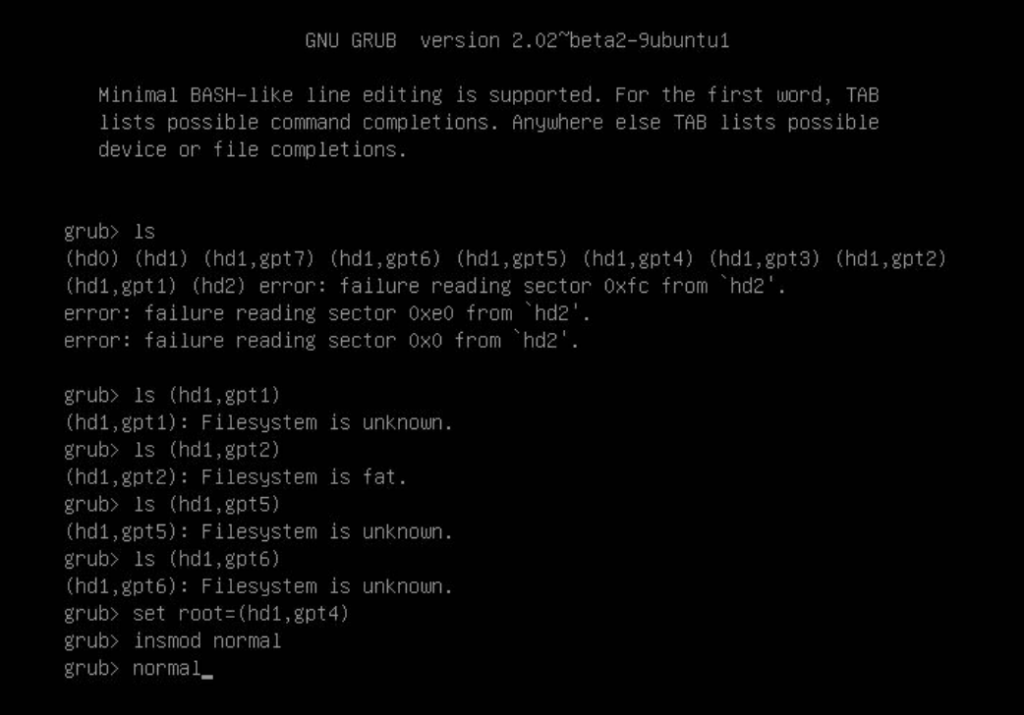
If I remember correctly, after booting up this is what happened:
I cannot remember what happened after attempting to boot (because there were several days of delay before I actually wrote this blog post, based on the collected screenshots). Also around this moment, I got the following “Secure Boot Violation”-screen:
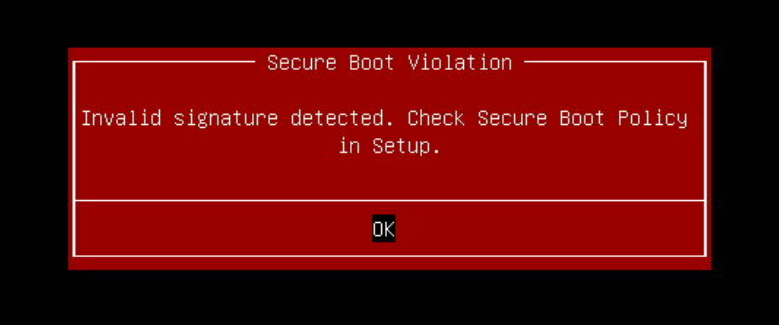
I had an idea that I had to enable “Secure boot”, because I temporarily turned that off in order to boot from my Arch Linux USB-stick in UEFI-mode (sorry I didn’t explain that above, I try to include many details but not everything and some pieces you have to put together yourself). The following screenshot is slightly manipulated:
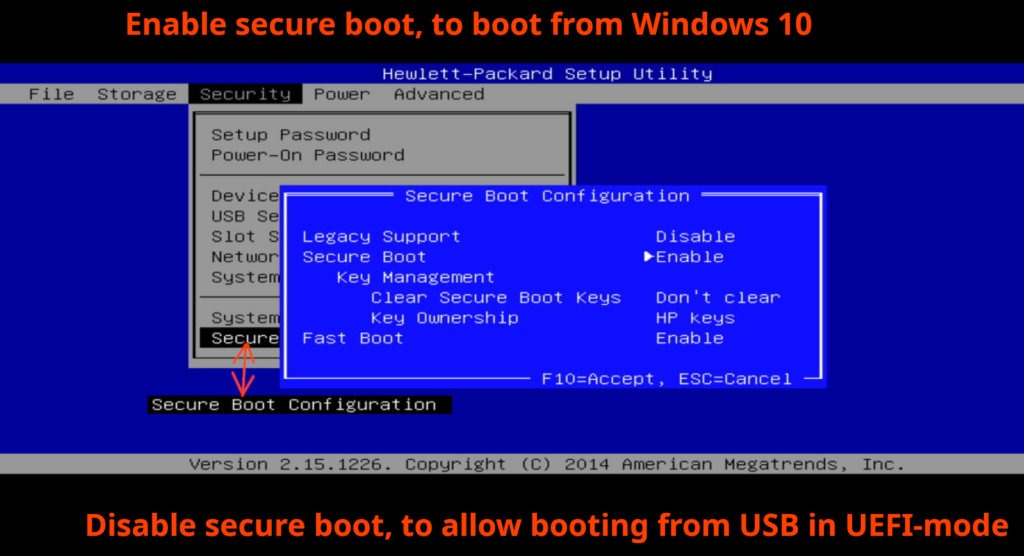
After enabling “Secure Boot”, you obviously need to “File” -> “Save Changes and Exit” -> select “Yes” to “Are you sure you want to Save Changes and Exit?”. At this point, I probably might’ve tried to boot into Windows but haven’t any screenshots of that – or maybe this is where I got the “Secure Boot Violation”-error message?
The next thing I remember is going into “System Recovery” – and then into “Windows Recovery” (the screenshot below is again combined of 2 screenshots):
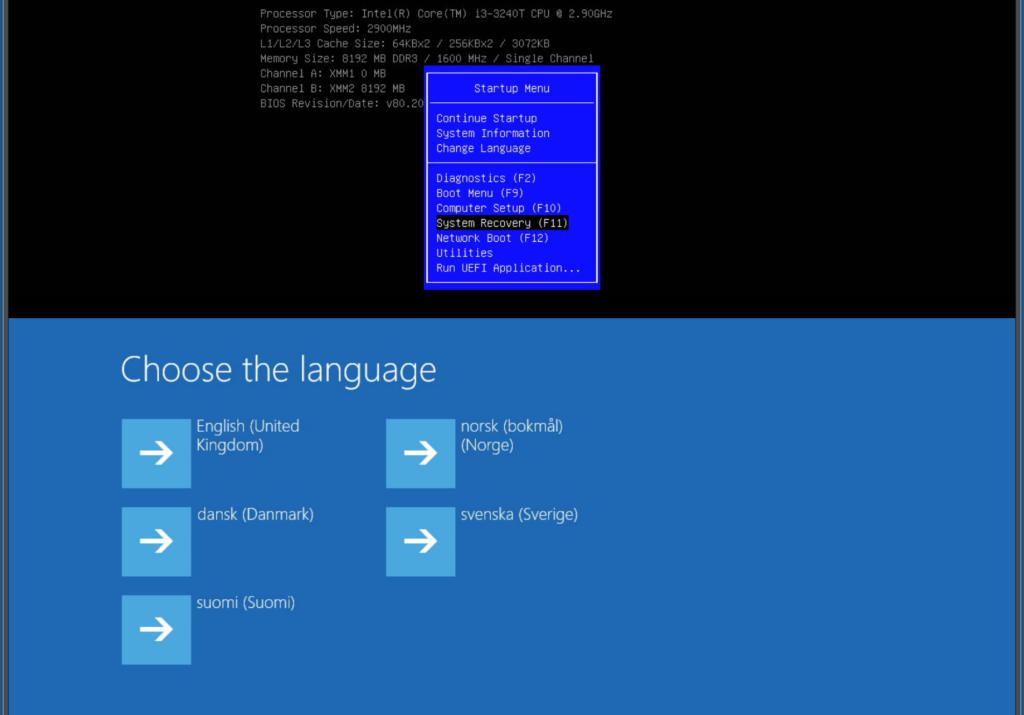
I was very optimistic now – would it all work now after another reboot?
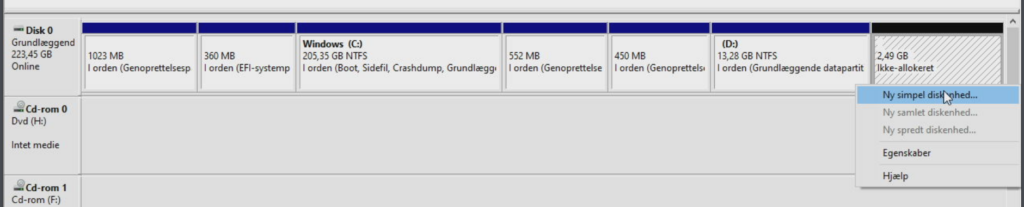
It did! Next time, the system automatically booted up in Windows, I installed a lot of upgrades and as you see I had (wasted) 2.49 GB unallocated disk space in the end. Ideally that space should’ve been added to the Windows C:\-drive because it’s difficult to use 2.49 GB. On the other hand, it’s not important that I waste 2.49 GB out of 240 GB and I had already spend enough hours on this old PC. I also know from experience that probably only 140-150 GB is ever being used, so there’s enough space.
Should I repeat this all over in the future, I think I would’ve put in extra effort to end exactly at the 13.28 GB NTFS boundary, aligned up correctly towards the last sector of the hard-disk. I would just have to expand the C:\-drive by the number of sectors, corresponding to 2.49 GB of data and then all the subsequent “start-sectors” would increase by that same “number-of-sectors”-amount. If done properly, there would be no un-allocated free (wasted) disk space, in the end of the disk.
Minor/remaining issues to fix…
While shrinking partitions, I had to do some of the things described here:
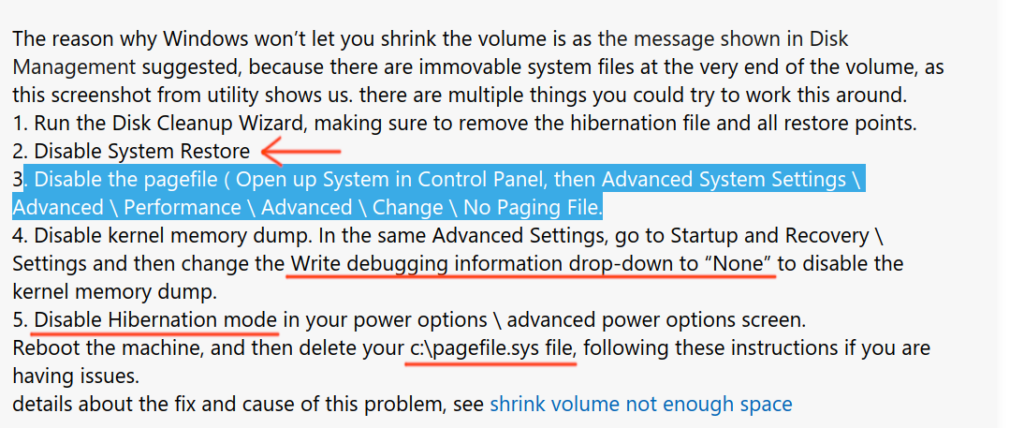
Now things were working again, I had to revert these things. At least I remember doing:
YMMV: It’s up to you what you do from here, if you’ve used this information to do something similar as I did here…
Conclusion
In this blog post, I’ve described how to use Clonezilla for moving several partitions (incl some NTFS-partitions), from a larger disk drive to a smaller disk drive. It’s a task that requires using some of the “expert”-features and I’ve described pretty much all the mistakes I did along the way. I think Clonezilla is a great free open-source software tool and if you read this and are about to do something similar with Clonezilla, you don’t have to make the same mistakes I did and hopefully you’ll be able to quicker accomplish your goal than me.
The most important outcome of this blog post is that I hope the reader now understands more about how to create a partition disk layout text file and how to write that partition layout to disk using e.g. “sfdisk” (I believe the concept behind all these partitioning tools is the same so feel free to use another partition tool for this task). Furthermore you should’ve gained a reasonable understanding of how to align the partition boundaries on the disk so a Clonezilla image containing several partitions all can fit into your manually created partitions.
I have not explained how to use the tool as a beginner – however I think I’ve included a lot of very detailed explanations and screenshots, to avoid any possible confusion and if you understand this I think you can easily use the “beginner”-mode also. The one place where I lost the exact details for the corresponding screenshot was when the “Secure Boot Violation” BIOS-message appeared – I think based on the rest of the descriptions, you should easily be able to figure out how to handle this, despite that.
Finally, thanks for reading this. If you have any comments, suggestions etc, please write in the “comments”-section just below here, thanks again!
5 replies on “Using Clonezilla expert mode and sfdisk for replacing a ~1 TB disk with a ~240 GB disk”
Thanks for posting. I really enjoyed reading it, especially because it addressed my problem. It helped me a lot and I hope it will help others too.
You helped me a lot by posting this article and I love what I’m learning.
Superb layout and design, but most of all, concise and helpful information. Great job, site admin. Take a look at my website FQ5 for some cool facts about Cosmetics.
Your posts stand out from other sites I’ve read stuff from. Keep doing what you’re doing! Here, take a look at mine UY8 for content about about Thai-Massage.
You’ve written terrific content on this topic, which goes to show how knowledgable you are on this subject. I happen to cover about SEO on my personal blog Article Sphere and would appreciate some feedback. Thank you and keep posting good stuff!